
Camera Settings for Outdoor Photography: A Field Guide
What if the right outdoor camera setting changes with every shift in light or movement? That’s often why a photo comes out too bright, too dark, or softer than you expected, even when you’ve followed a suggested setting. The best camera settings for outdoor photography aren’t one fixed recipe. They respond to the scene in front of you.
If you’re unsure where to begin, you’re not alone. Bright sun, deep shade, and moving subjects each ask something different of your camera. Adjusting several controls at once can make it hard to tell what caused the result. Start with one priority, then make one deliberate change at a time.
This field guide shows you how to adapt exposure, focus, and shooting modes as outdoor conditions change. You’ll learn how aperture, shutter speed, and ISO work together, what to adjust when a subject moves or the light shifts, and how to build a repeatable routine before each shot. The aim isn’t to memorise perfect numbers. It’s to recognise what the scene needs and make your next choice with more confidence.
Key Takeaways
- Choose a starting exposure based on the scene, then adjust rather than relying on one fixed outdoor setting.
- Use aperture, shutter speed, and ISO to balance brightness with the depth of field and motion you want.
- Compare light conditions such as sun, shade, and backlight, and watch for visual cues that signal a change is needed.
- Follow a simple field workflow to set priorities, check exposure and focus, and review a test shot.
- Practise camera settings for outdoor photography with one subject in changing light, and note how each adjustment affects the result.
Camera Settings for Outdoor Photography: Start With the Scene
Unsure which dial to turn first? Begin by reading the scene, not by searching for a perfect preset. Outdoor light can shift from direct sun to shade in a few steps, while a still landscape and a moving subject call for different choices. Aperture, shutter speed, and ISO work together to determine exposure, but the right starting point depends on what you want the photograph to show.
Outdoor photography can include landscapes, plants, and wildlife, as described in Nature photography. Even in the same daylight, you might use a faster shutter speed to keep a moving bird sharp, or a wider aperture to soften the background behind a still flower. Neither choice is automatically best. Each serves a different intention.
Quick scene assessment
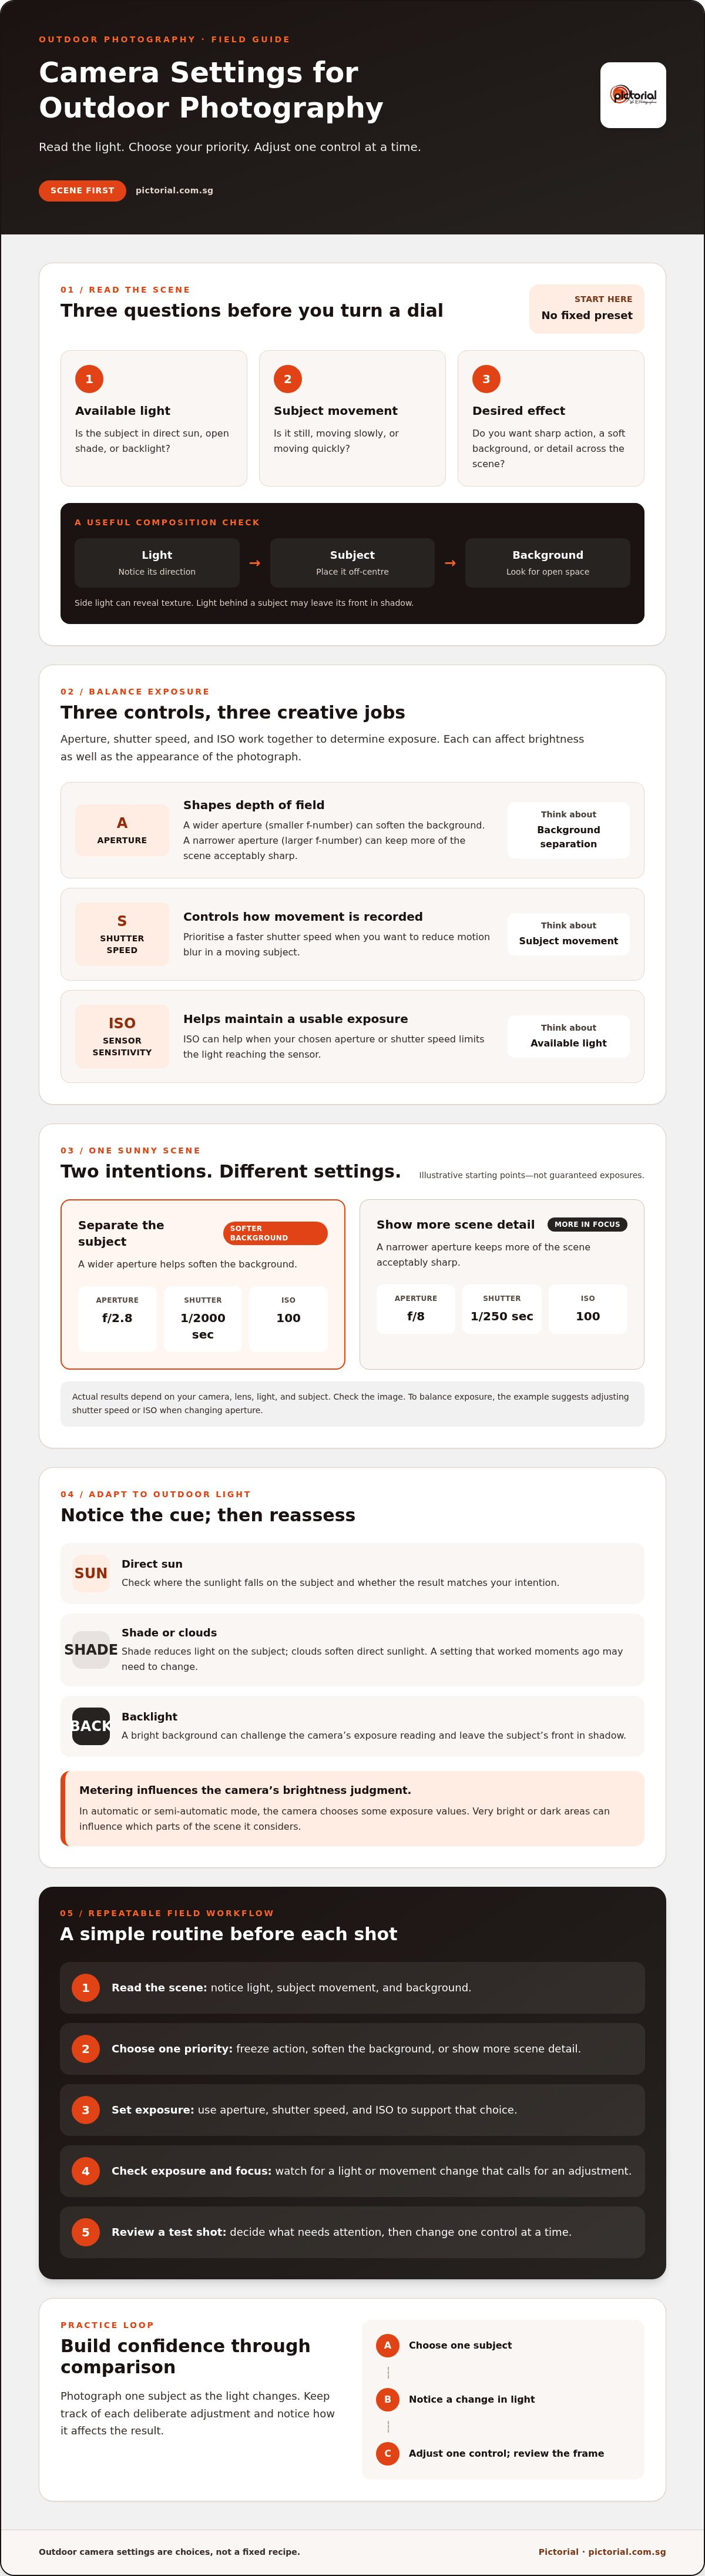
- Available light: Is the subject in direct sun, open shade, or backlight?
- Subject movement: Is it still, moving slowly, or moving quickly?
- Desired effect: Do you want sharp action, a soft background, or detail across the scene?
Example frame: Sunlight → subject from the side | Subject → placed off-centre | Background → open space for separation
Use this simple frame to notice where the light falls and where your subject sits before changing settings.
What to assess before changing camera settings
First, check whether your subject is still or moving, and whether it’s shaded or directly lit. Then decide what matters most: freezing action or separating the subject from its background. For a moving subject, prioritise a shutter speed that reduces motion blur. For a still subject against a busy background, consider a wider aperture. Check the direction of the light too. Side light can reveal texture, while light behind the subject may leave its face or front in shadow.
Why outdoor photography has no single best preset
Clouds soften direct sunlight, shade reduces the light on your subject, and backlight can make a bright background challenge the camera’s exposure reading. As daylight changes, a setting that worked moments ago may no longer give you the result you want. Camera mode also matters. In an automatic or semi-automatic mode, the camera chooses some exposure values for you. Metering tells it which parts of the scene to consider when judging brightness, so a very bright or dark area can influence the result.
Camera settings depend on both the light in front of you and the effect you want to create. Treat any suggested setting as a starting point. Check the image, identify what needs attention, and adjust one control at a time.
Balance Aperture, Shutter Speed, and ISO in Outdoor Light
Once you’ve decided what the photograph should show, use aperture, shutter speed, and ISO to support that choice. Aperture affects how much of the scene appears acceptably sharp. Shutter speed controls how movement is recorded. ISO affects the camera sensor’s sensitivity to light, helping you maintain a usable exposure when your chosen aperture or shutter speed limits the light reaching the sensor. Each adjustment can change both brightness and the photograph’s appearance.
For a deeper explanation of how these controls work together, see photography courses. Sony’s Manual Settings For Outdoor Photography also offers examples of settings choices for different outdoor subjects and effects.
Choose aperture for the depth of field you want
A wider aperture, represented by a smaller f-number, can help separate a subject from a soft background. A narrower aperture, represented by a larger f-number, can keep more of the scene in focus. The useful choice depends on your subject, its distance from the background, and the effect you want, not on a universal outdoor recommendation.
Imagine a flower in direct sun with a path behind it. For a close flower with a softly separated background, try a wider aperture and adjust shutter speed to keep exposure balanced. To show more detail in the flower and its surroundings, choose a narrower aperture and compensate with a slower shutter speed or higher ISO if needed.
Same sunny scene, two intentions
- Subject separation: f/2.8, 1/2000 sec, ISO 100. The wider aperture helps soften the background.
- More scene detail: f/8, 1/250 sec, ISO 100. The narrower aperture keeps more of the scene acceptably sharp.
These are illustrative starting points, not guaranteed exposures. Actual results depend on your camera, lens, light, and subject. Check your image and adjust as needed.
Choose shutter speed and ISO for light and movement
A faster shutter speed can reduce blur from a moving subject, while a slower one can show movement as a streak. In bright sun, you may have enough light to use a faster shutter speed without raising ISO. If you narrow the aperture or need a faster shutter speed and the image looks too dark, increase ISO to support the exposure. Higher ISO can make image noise more visible, so raise it only as much as the situation requires.
For practical camera settings for outdoor photography, change one control at a time and review the result. If a moving subject looks blurred, try a faster shutter speed. If the background is too distracting, consider a wider aperture. After each change, check brightness too, because the adjustment can affect overall exposure.
Compare Outdoor Settings for Sun, Shade, and Moving Subjects
Use the scene as your guide, then check what the camera has recorded. In harsh sun, bright highlights and deep shadows can appear in the same frame, so exposing for one area may leave another too bright or too dark. Open shade and overcast light usually soften contrast, but can also make a subject appear less bright. These are starting approaches, not fixed presets. Watch the details that matter in your frame and adjust if they aren’t coming through.
How to approach bright sun, shade, and overcast light
Read each row as a field check: begin with the suggested priority, then respond to the visual cue. The right camera settings for outdoor photography depend on your subject and the look you want.
Scene | Starting approach | Adjust when you see…
Bright sun: Protect important bright areas; check how strong the shadows look. | Highlights lose texture, or the subject’s shadowed side becomes too dark.
Open shade: Expose for the subject rather than the brighter surroundings. | The subject looks dim, or the bright background draws attention away.
Overcast: Use the softer light to show even detail across the subject. | The image looks flat, or a moving subject appears blurred.
Backlight: Decide whether you want detail on the subject or a bright, glowing background. | The subject becomes a silhouette when you wanted to see its features, or the background loses detail.
Still subject: Prioritise the aperture and depth of field that suit the composition. | The subject or the area you want sharp looks soft.
Moving subject: Prioritise shutter speed according to whether you want to freeze or show movement. | The subject’s motion looks more blurred or frozen than intended.
Read the frame: Imagine a sunlit person standing beneath a tree. The bright patch behind them is the highlight; their face under the leaves is the shadow; their position in the frame is the subject placement. If the face is your priority, adjust exposure for it, then check whether the bright background still holds enough detail.
How subject movement changes setting priorities
A stationary flower gives you time to choose depth of field and steady the camera. A person walking or an animal running may need a faster shutter speed if you want crisp movement. If you prefer a visible sense of motion, a slower shutter speed may suit your intention, though the subject will blur. Check the result rather than assuming the same choice fits every scene.
Before: A moving subject looks blurred. Adjustment: Use a faster shutter speed and check exposure.
After: The subject appears sharper, though the background and brightness may differ. Compare both frames at playback to see whether the change matches your intention.
These comparisons describe effects, not guaranteed results. Actual settings depend on the light, camera, lens, subject speed, and the look you’re aiming for.
Use This Outdoor Camera Settings Workflow in the Field
A repeatable routine makes changing conditions easier to handle. Instead of adjusting several controls at once, decide what matters in this frame, take a test shot, and make one deliberate correction. That makes it easier to see what changed and learn from each result.
A repeatable sequence before pressing the shutter
- Identify the subject. Decide what should look sharp and whether it’s still or moving.
- Choose your intent. Pick the result you want, such as freezing a moving subject or keeping more of a landscape in focus.
- Set your priority. Choose the exposure control that best supports that intent. For movement, start with shutter speed. For depth of field, start with aperture. Set ISO to help achieve the exposure you need.
- Frame and focus. Place the focus point over the important part of the subject. Use your camera’s viewfinder or screen to confirm focus, and check the exposure display before taking the shot.
- Take a test frame. Review it, identify one issue, then change one setting and shoot again.
Field sequence: Subject → Intent → Priority setting → Focus and exposure check → Test frame
Use the camera’s available controls. Depending on the model, exposure can be checked on the live display or playback screen, with tools such as a histogram, highlight warning, or exposure scale.
For example, if a person walking in strong daylight looks blurred, try a faster shutter speed. Take another frame and check both sharpness and brightness. If the image is now too dark, adjust ISO or another exposure control, then compare again. Changing one setting at a time helps you see cause and effect instead of guessing.
Review the frame and make a deliberate correction
At playback, inspect the subject first. Is the key detail in focus? Does the movement look the way you intended? Then check for highlights that have lost detail or shadows that appear too dark. If your camera offers a histogram, use it to see how tones are distributed and spot possible clipping at either end. It’s a guide, not a verdict: a bright scene can naturally produce a histogram weighted toward the highlights, so consider the display alongside the image and your creative intent.
Repeat the cycle: review, choose one correction, take another frame, and compare. This practical approach to camera settings for outdoor photography works across changing light because it keeps your attention on the subject and the result, not on memorising a preset. For more ideas on building the habit, explore practical photography courses.
Practise Outdoor Settings and Build Confidence With Your Camera
You don’t need a complicated setup to practise. A familiar subject, such as a plant, a parked bicycle, or a textured wall, gives you a steady point of comparison while the light changes. The aim is to notice what each camera adjustment does, not to produce a perfect frame every time.
A simple practice exercise for changing outdoor light
Photograph the same subject in two different available lighting conditions, such as direct sun and open shade. Keep your framing as consistent as you can, and work through this sequence:
- Choose an intention: decide what should look sharp and whether you want to show or minimise background detail.
- Take a first frame: use settings that seem sensible for the subject and light.
- Change one control: adjust aperture, shutter speed, or ISO, then take another frame. Keep the other choices steady where practical.
- Compare: look at brightness, focus, background detail, and any motion blur. Repeat in the second lighting condition.
Keep a short note with each pair: describe the light and subject, record your settings, state the effect you intended, and write down what the photograph actually shows. This makes it easier to spot patterns the next time you’re deciding on camera settings for outdoor photography.
Example alt text: “Same potted plant photographed in direct sun and open shade to compare highlights and shadow detail.” Caption: “The subject and framing stay similar while the light changes, making the difference in contrast easier to see.” Descriptive alt text identifies what the instructional image demonstrates, while a useful caption explains why the comparison matters.
When hands-on photography guidance may help
If you understand a setting in theory but find it hard to predict the result in the field, guided practice can help connect the camera control to what appears on screen. Pictorial offers hands-on photography courses with practical outdoor guidance. You can practise with your own camera or borrow a complimentary camera provided by the school if needed. Review the beginner photography course details to see whether that learning option fits what you’re looking for.
Keep practising at your own pace. With each comparison, you’ll build a clearer sense of which adjustment to try next.
Explore Pictorial photography courses
Take Your Next Outdoor Photograph With Confidence
Good camera settings for outdoor photography start with noticing what the scene asks of you. Choose settings around your subject and the effect you want, then make one adjustment at a time as the light or movement changes. A quick review of exposure, focus, and motion helps you decide what to try next.
Keep practising with one subject in different light. Comparing your frames and noting what changed will help turn camera controls into familiar choices. You don’t need to get every setting right straight away; each considered adjustment teaches you something useful.
If you’d like guidance as you practise, Pictorial offers hands-on photography courses with practical outdoor guidance. Classes have a maximum of three participants, and a complimentary camera loan is included with every course if needed.
Explore Pictorial photography courses
Take it one frame at a time. With practice, you’ll feel more at ease adapting your settings to the scene in front of you.
Frequently Asked Questions
Is there one best camera setting for outdoor photography?
No, the best settings depend on the available light, how your subject is moving, and the effect you want. For camera settings for outdoor photography, begin by deciding what should look sharp and whether you want to freeze or show movement. Choose the setting that matters most for that goal, take a test frame, then review brightness and focus. Adjust one control at a time rather than relying on a fixed preset.
What camera mode should I use for outdoor photography?
Choose a mode based on which setting you want to control. Aperture Priority lets you choose aperture while the camera selects a shutter speed, which can be useful when depth of field matters. Shutter Priority lets you set shutter speed to manage movement. Manual mode gives you control over both, while Program or automatic modes let the camera make more decisions. Check your camera’s exposure display and review a test frame to see how it responds.
What ISO should I use for outdoor photography?
There isn’t one ISO value that suits every outdoor scene. Your choice depends on the available light and the aperture and shutter speed you need. In brighter conditions, a lower ISO may allow your preferred settings; in shade or when using a fast shutter speed, you may need to raise it to maintain exposure. Review the image for brightness and visible noise, then adjust ISO only if the other priorities leave the photo too dark.
How do I set my camera for outdoor portraits?
For an outdoor portrait, decide how much you want to separate the person from the background, then choose an aperture that supports that look. Focus on the person’s eyes when they’re visible, and check that focus on playback. Notice whether the light falls evenly across the face or leaves strong shadows. Take a test photo, inspect exposure and sharpness, and adjust one setting or your position if the result doesn’t match your intention.
How do I stop outdoor photos from looking too bright?
Check the bright areas in playback and look for highlights that have lost detail. If your camera has a highlight warning or histogram, use it as a guide alongside the image. Then adjust one exposure control: for example, reduce exposure compensation if you’re using an automatic or semi-automatic mode, or change aperture, shutter speed, or ISO in manual mode. Take another frame and compare the important details before making further changes.
Should I use autofocus or manual focus outdoors?
Autofocus is often a practical choice for moving subjects because it can adjust focus as they move, especially when your camera offers a suitable subject-tracking mode. Manual focus can help with stationary subjects when you want precise control or autofocus struggles to select the detail you intend. Whichever you choose, check focus on the camera display or playback. The right method depends on movement, focus accuracy, and how much control you want.
Can I use these outdoor camera settings with a phone camera?
Yes, the same ideas apply, though the controls available vary by phone and camera app. Tap the subject to set focus, then use any on-screen exposure adjustment to make the image brighter or darker. If your phone offers options for shutter speed, ISO, or focus, experiment with them one at a time. Take a test photo and review the subject and highlights. Even with automatic controls, choosing your focus point and checking exposure can help.

Disclaimer
© Pictorial | All Rights Reserved.