
How to Control Aperture and Shutter Speed: A Practical Guide
What if the best camera setting isn’t simply the one that makes the exposure look right, but the one that creates the effect you want? Learning how to control aperture and shutter speed can feel unpredictable at first. Change one setting and the brightness shifts; choose a faster shutter and you may need to adjust another setting.
That uncertainty is normal. Aperture affects how much of the scene appears in focus, while shutter speed affects how movement is recorded. Start by deciding which effect matters most, then balance your settings to support it.
This guide explains how to choose aperture and shutter speed together, interpret f-stop numbers in real situations, and decide when to prioritise a sharp moving subject or a softly blurred background. You’ll also learn a repeatable way to practise, so each adjustment feels deliberate rather than like guesswork.
Key Takeaways
- Choose the visual effect you want first, then decide which setting matters most for the scene.
- Learn how aperture and shutter speed work together, and anticipate when changing one may mean adjusting the other.
- Compare Aperture Priority, Shutter Priority, and Manual mode to find a practical fit for your situation.
- Use a repeatable routine: set your controls, check the exposure indicator or preview, and refine the shot.
- Build confidence through hands-on practice with your own camera or a complimentary camera loan if needed.
How to Control Aperture and Shutter Speed: Start with the Photo You Want
You don’t need to change several settings at once to take control. First decide what you want the photograph to look like, then make one deliberate choice about focus or motion. As you learn how to control aperture and shutter speed, it becomes easier to connect each choice to the scene in front of you.
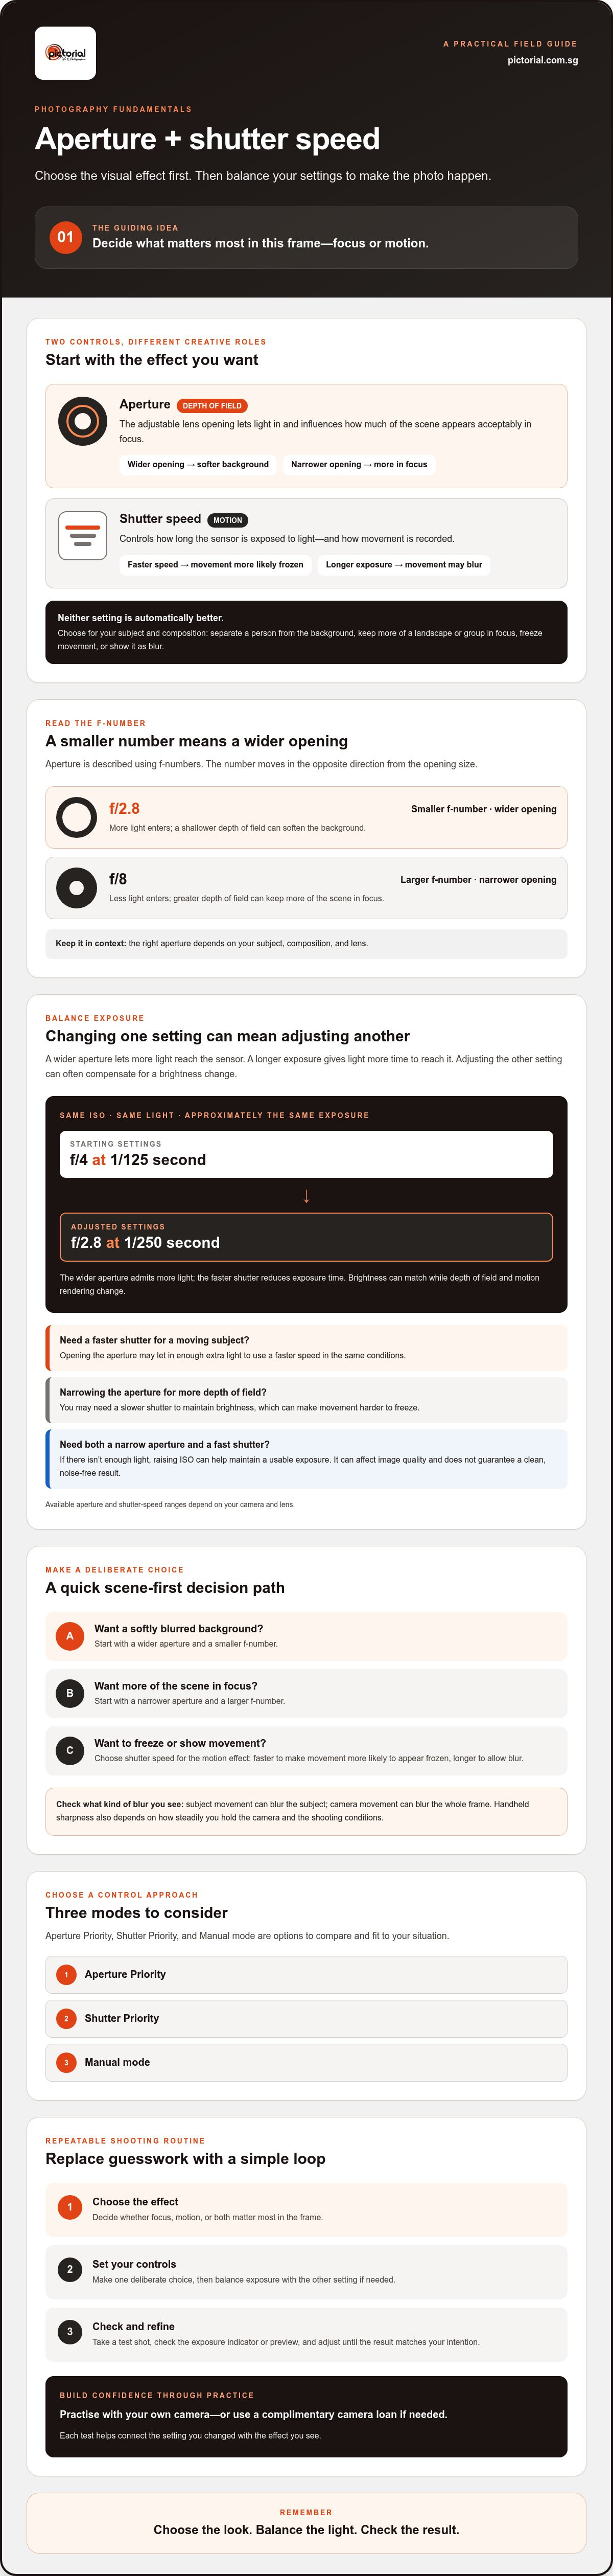
Aperture shapes depth of field; shutter speed shapes how motion appears. Aperture is the adjustable opening in the lens that lets light in. Shutter speed determines how long the camera’s sensor is exposed to light. Both affect exposure, but they have different creative roles. The Aperture reference explains the opening’s technical role and its relationship with shutter speed in controlling exposure.
What does aperture change in a photograph?
Aperture is described using f-numbers, such as f/2.8 or f/8. A smaller f-number means a wider opening; a larger f-number means a narrower one. Aperture also affects depth of field, or how much of the scene appears acceptably in focus.
A wider aperture can help separate a person from a softly blurred background. A narrower aperture can keep more of a landscape or group in focus. Neither is automatically better. The right choice depends on your subject, composition, and lens.
What does shutter speed change in a photograph?
Shutter speed controls how long movement is recorded. A fast speed can make a walking person look sharp, while a longer exposure can turn flowing water into a soft blur. If you want to show movement rather than freeze it, that blur can be an intentional part of the image.
There’s an important distinction: a moving subject can blur during a long exposure, while camera movement can blur the whole frame. Handheld sharpness depends on more than the number on your shutter display, including how steadily you hold the camera and the shooting conditions. If a photo looks soft, check whether the subject moved, the camera moved, or both.
Before adjusting either setting, ask what matters most in this frame. Do you want to separate the subject from the background, keep more of the scene in focus, or freeze or show movement? Your answer gives you a useful starting point. Take a test shot and check whether the result matches your intention, rather than treating f-numbers and shutter speeds as isolated technical hurdles.
How Aperture and Shutter Speed Work Together to Balance Exposure
Once you’ve chosen the visual effect you want, balance the light. A wider aperture lets more light reach the sensor, while a longer exposure gives light more time to reach it. If a change makes the image brighter than intended, the other setting can often be adjusted to compensate.
For example, at the same ISO and in the same light, changing from f/4 at 1/125 second to f/2.8 at 1/250 second keeps the exposure approximately the same. The wider aperture admits more light, while the faster shutter reduces exposure time. The Photography 101: Apertures and Shutter Speeds guide from NANPA also explains how these controls affect depth of field and motion.
Matching brightness doesn’t guarantee the same creative result: aperture changes depth of field, while shutter speed changes how motion is recorded.
| Adjustment | Effect on exposure | Creative effect to consider |
|---|---|---|
| Wider aperture, lower f-number | More light enters | Shallower depth of field can soften the background |
| Narrower aperture, higher f-number | Less light enters | Greater depth of field can keep more of the scene in focus |
| Longer exposure, slower shutter | More light is recorded over time | Moving subjects or camera movement may appear blurred |
| Shorter exposure, faster shutter | Less light is recorded over time | Movement is more likely to appear frozen |
How changing aperture can affect shutter speed
Suppose you’re photographing someone moving and want a faster shutter to reduce subject blur. Opening the aperture may let in enough extra light to use that faster speed in the same conditions. If you narrow the aperture for more depth of field, you may need a slower shutter to maintain brightness, which can make movement harder to freeze. Your camera and lens determine the available aperture and shutter-speed range, so the exact options vary.
When ISO also needs to change
If you need both a narrow aperture and a fast shutter but there isn’t enough light, ISO becomes a third exposure control. Raising ISO can help you maintain a usable exposure without slowing the shutter or opening the aperture. It can also affect image quality, so it doesn’t guarantee a clean, noise-free result. As you practise how to control aperture and shutter speed, treat ISO as an adjustment when your preferred creative choices leave too little light.
To practise the trade-off, take two photos of the same subject at similar brightness: one with a wider aperture and faster shutter, then another with a narrower aperture and slower shutter. Compare the background and any movement. If guided camera practice would help, Pictorial’s Basic Photography Course is an optional learning route.
Which Should You Set First: Aperture or Shutter Speed?
Set the control that protects the most important effect in your photograph. If depth of field matters most, choose aperture and check the shutter speed the camera selects. If motion matters most, choose shutter speed and review how the camera balances exposure. This simple order makes how to control aperture and shutter speed easier to apply in the moment.
| What you want | Prioritise | Trade-off to check |
|---|---|---|
| Separate a portrait subject from the background | Aperture | Check that the resulting shutter speed is fast enough for a steady, sharp shot |
| Keep foreground and background details in focus | Aperture | A narrower aperture may mean a slower shutter speed or another exposure adjustment |
| Freeze a moving person | Shutter speed | A faster shutter lets in less light, so review exposure and ISO |
| Show motion as a deliberate blur | Shutter speed | A longer exposure can also record camera movement |
Prioritise aperture when depth of field matters most
For a portrait, you might want the face sharp while the background falls softly out of focus. Aperture Priority mode, often marked A or Av, lets you choose the aperture while the camera selects a shutter speed based on its exposure reading. It’s also useful when you want foreground and background details to remain in focus. Check the shutter speed before shooting, especially when holding the camera by hand.
Prioritise shutter speed when motion matters most
If you’re photographing someone running or another subject that won’t stay still, Shutter Priority mode, often marked S or Tv, lets you choose the shutter speed while the camera adjusts aperture. This helps you keep your chosen motion effect consistent across changing moments. Watch the exposure display, and adjust ISO or another setting if the camera can’t balance the light as needed.
Manual mode gives you direct control of both settings. It can be useful when you want them to stay fixed or when automatic adjustments aren’t producing the result you need. But you don’t have to use it to control both creative effects. Aperture Priority and Shutter Priority each let you protect one choice while the camera helps with the other. Choose the mode that suits the scene, then check the trade-off.
How to Adjust Aperture and Shutter Speed: A Repeatable Shooting Routine
A steady routine makes how to control aperture and shutter speed easier to practise, even when the light or subject changes. Instead of turning dials until the picture looks right, make one choice, take a test frame, and check what changed.
- Identify the subject. Notice what needs to stay sharp and whether anything is moving.
- Choose the intended effect. Decide whether depth of field or the way motion appears matters more for this frame.
- Set a priority. Choose an aperture or shutter speed that supports that effect, using the camera mode that lets you prioritise it.
- Review and adjust. Check the image and exposure display, then change one setting deliberately if needed.
Look for the exposure indicator in the viewfinder or on the screen. Depending on your camera, it may show whether the selected settings are expected to produce a darker or brighter exposure. A live preview may also help, but displays and controls vary by model, so check your camera manual to learn how they work. Use the test frame to assess focus, motion, and brightness, not brightness alone.
Before you press the shutter, ask: What’s my subject, what effect do I want, which setting controls it, and what should I check in the result?
A quick practice exercise for a still subject
Choose a stationary subject, such as a cup on a table, with some detail behind it. Take one photo using a wider aperture, then another using a narrower aperture. If the second image becomes too dark, adjust shutter speed to let in more light, provided the camera is steady and the scene remains still. Compare how much of the background appears in focus, and note the settings and what you observe.
A quick practice exercise for a moving subject
Photograph someone walking across your view, or choose another moving subject. Decide whether you want the movement to look frozen or blurred, then change shutter speed deliberately between frames. Check motion sharpness and exposure, adjusting another setting if needed. For more ideas about practising outdoors, refer to a guide on outdoor camera settings.
Small comparisons teach you more than random dial changes. If you’d like guided, practical camera practice, the Basic Photography Course is an optional next step.
Explore the Basic Photography Course
Build Confidence Controlling Aperture and Shutter Speed Through Practice
The controls become more familiar each time you connect a setting to a visible result. Keep the main principle in mind: decide which visual effect matters most, then balance the other setting around it. A missed focus point or an exposure that needs another try isn’t wasted effort. It gives you something specific to check in the next frame.
How to make practice useful rather than overwhelming
Choose a simple scene and take a few comparison shots. Change one setting at a time so you can see what that adjustment did. After each frame, jot down:
- The aperture and shutter speed you used
- The effect you intended, such as more background blur or sharper motion
- What you noticed in the finished photograph
Don’t judge the result by brightness alone. Check whether the subject looks sharp, how much of the scene is in focus, and whether movement appears as you intended. Camera menus, dials, and exposure displays vary between models, so consult your camera manual if you’re unsure how to select a mode or read its indicators. You don’t have to master every control at once.
Where to continue learning camera control
If you’re ready to explore beyond automatic settings, take one step at a time. Try a priority mode and observe which setting the camera changes for you, then compare that result with a deliberate adjustment of your own. This practice can help the controls feel less like separate numbers and more like choices you make for a scene.
You can practise with your own camera. If you don’t have one available, Pictorial includes a complimentary camera loan with every course, if needed. For learners who’d value personal guidance, the Basic Photography Course is an optional way to work on camera handling through practical instruction. A course isn’t required to learn these skills; comparing real scenes is a good place to begin.
Take Your Next Photograph with More Confidence
Good camera control starts with a simple habit: choose the visual effect that matters most, then balance the other setting around it. Aperture helps shape depth of field, while shutter speed guides how motion appears. If the exposure needs adjustment, make one considered change and check the result.
That’s the practical foundation of how to control aperture and shutter speed. You don’t need to memorise every setting before you begin. Try the process with familiar scenes, compare your photographs, and note which choices created the effect you wanted. Small experiments build understanding frame by frame.
If you’d like guided, hands-on practice, Pictorial’s Basic Photography Course is an optional next step. Classes are small, with a maximum of three participants, and a complimentary camera loan is included with every course if needed.
Explore the Basic Photography Course
Keep practising at a pace that feels comfortable. Each deliberate adjustment brings you closer to making photographs that reflect your intention.
Frequently Asked Questions
How do you control aperture and shutter speed at the same time?
Choose the effect you want most, then set the control that shapes it. For background blur, select an aperture; to manage motion, choose a shutter speed. Use Aperture Priority or Shutter Priority to let the camera balance the other setting, or use Manual mode to set both yourself. Check the exposure display and take a test frame. If the brightness or image effect isn’t right, adjust one setting and review the result.
Should I adjust aperture or shutter speed first?
Adjust whichever setting controls the most important effect in the photograph. For a portrait with a soft background, prioritise aperture, then check the shutter speed. For a moving subject you want to keep sharp, prioritise shutter speed and review the exposure. There’s no single order for every scene. Start with your intention, then take a test shot to see whether the other setting needs adjustment.
What camera mode lets me control aperture and shutter speed?
Manual mode lets you set both aperture and shutter speed directly. Aperture Priority, often marked A or Av, lets you choose aperture while the camera selects shutter speed. Shutter Priority, often marked S or Tv, lets you choose shutter speed while the camera selects aperture. These priority modes let you guide the image effect without setting both controls yourself. Mode names and controls can vary, so check your camera manual.
How does aperture affect shutter speed?
A wider aperture lets more light reach the sensor, which may allow a faster shutter speed while maintaining similar brightness. A narrower aperture lets in less light, so the camera may use a slower shutter speed or another exposure adjustment. The exact settings depend on the lighting and your camera and lens. Remember that the two choices affect different visual qualities: aperture changes depth of field, while shutter speed affects how motion appears.
What aperture and shutter speed should I use for moving subjects?
For a moving subject, choose a shutter speed based on whether you want to freeze motion or show blur. A shutter speed of 1/500 second or faster is a useful starting point for freezing action, but the subject’s speed and direction matter. Then check whether the aperture and available light give a suitable exposure. Take a test frame, inspect sharpness, and adjust deliberately. Handheld camera movement can also affect sharpness.
Can I control aperture and shutter speed without using Manual mode?
Yes. Aperture Priority lets you choose aperture and leaves shutter speed to the camera; Shutter Priority lets you choose shutter speed and leaves aperture to the camera. These modes help you prioritise depth of field or motion without managing both controls directly. Check the setting the camera selects, especially if light is limited. Manual mode is an option when you want direct control, but it isn’t required for deliberate photography.
Why does my photo get darker when I change aperture or shutter speed?
Your photo may get darker because the change reduces the light recorded. Choosing a narrower aperture reduces the opening, while using a faster shutter shortens exposure time. To compensate, you might widen the aperture, use a slower shutter if the scene allows, or raise ISO. Which adjustment is suitable depends on the effect you want and the available light. Check the exposure indicator or preview, and consult your camera manual if needed.

Disclaimer
© Pictorial | All Rights Reserved.