
Learn Photography from Scratch: A Beginner’s Guide to Choosing Your Path
What if you could learn photography from scratch without buying a new camera or memorising every setting first? It’s understandable if camera controls and unfamiliar terms feel like a lot to take in. But progress comes from practising a few foundations in order, not trying to master everything at once.
This guide will help you understand what to practise first, compare self-study, phone-based learning and hands-on instruction, and choose a manageable next step that fits your experience, equipment and goals. You’ll start with useful basics such as noticing light, focusing carefully and composing a clear image, then build towards camera settings as you gain confidence.
You can begin with the camera or phone you already have. The important thing is to practise in real situations, look at the results and make one small adjustment at a time. As you read, consider how much structure and personal guidance would help you keep going. By the end, you’ll have a clearer sense of which learning path suits you and a practical way to put it into action.
Key Takeaways
- To learn photography from scratch, build skills in a useful order, starting with observation and composition before working through focus and exposure.
- Understand how ISO, aperture and shutter speed affect an image so you can adjust them with a clear purpose.
- Self-study gives you flexibility, while guided instruction can offer feedback; choose the approach that helps you practise consistently.
- Turn camera knowledge into skill with a simple loop: set one goal, take photos, review them and adjust.
- The Photography Starter Session offers one three-hour session for learners aged nine and above who want to try a short introduction.
Learn photography from scratch: what should a beginner learn first?
You can start with the camera or phone you already own. When you want to learn photography from scratch, it is less about having the newest equipment and more about noticing what is in front of you, making choices with your camera, and practising those choices deliberately. If the controls seem confusing, take them one step at a time. You don’t need to understand every feature before you make a photograph.
Think of a simple scene, such as a cup beside a window. Notice where the light falls, choose what to include in the frame, focus on the cup, then review the image. Is the subject clear? Does the background distract from it? That short process builds observation, composition and camera control together. Technical settings give you ways to make intentional choices, but progress comes from using them repeatedly, not memorising a camera manual.
Exposure is the result of controlling how much light reaches the camera’s sensor to create an image. You’ll learn how to manage that light as you practise. For a broad overview of photography’s history, techniques and uses, see What is Photography?
What does learning photography from scratch involve?
Start by looking before you shoot. Find the main subject, observe the direction and quality of light, and decide how to frame the scene. Focus on the detail that matters, take the photograph, then review it with one question in mind. This makes each attempt useful, even when the result isn’t what you expected. Camera controls support these decisions; they don’t replace careful looking.
Keep the first goal small. Photograph the same object near a window at different times of day, for example, and compare how the changing light affects its appearance. You’ll begin to connect what you see with what the camera records. A structured learning path can help you build on those foundations; explore structured photography course options such as a comprehensive photography course or an intermediate photography course as your confidence grows.
What equipment do beginners need to get started?
A phone or suitable camera is enough to begin practising composition, light and focus. Use what you have, and get familiar with how it focuses and how you can review images. You don’t need to buy advanced equipment or editing software to learn the basics. First understand what you want to change in a photograph; then you can decide whether a different tool would help.
DSLR and mirrorless cameras are interchangeable-lens options that provide hands-on control, but neither is a prerequisite for learning. If you want to practise with a camera without bringing your own, Pictorial offers Complimentary camera loan (if needed) with every course. That lets you focus on observing and making photographs rather than delaying practice until you own more equipment.
Build photography foundations in a practical learning sequence
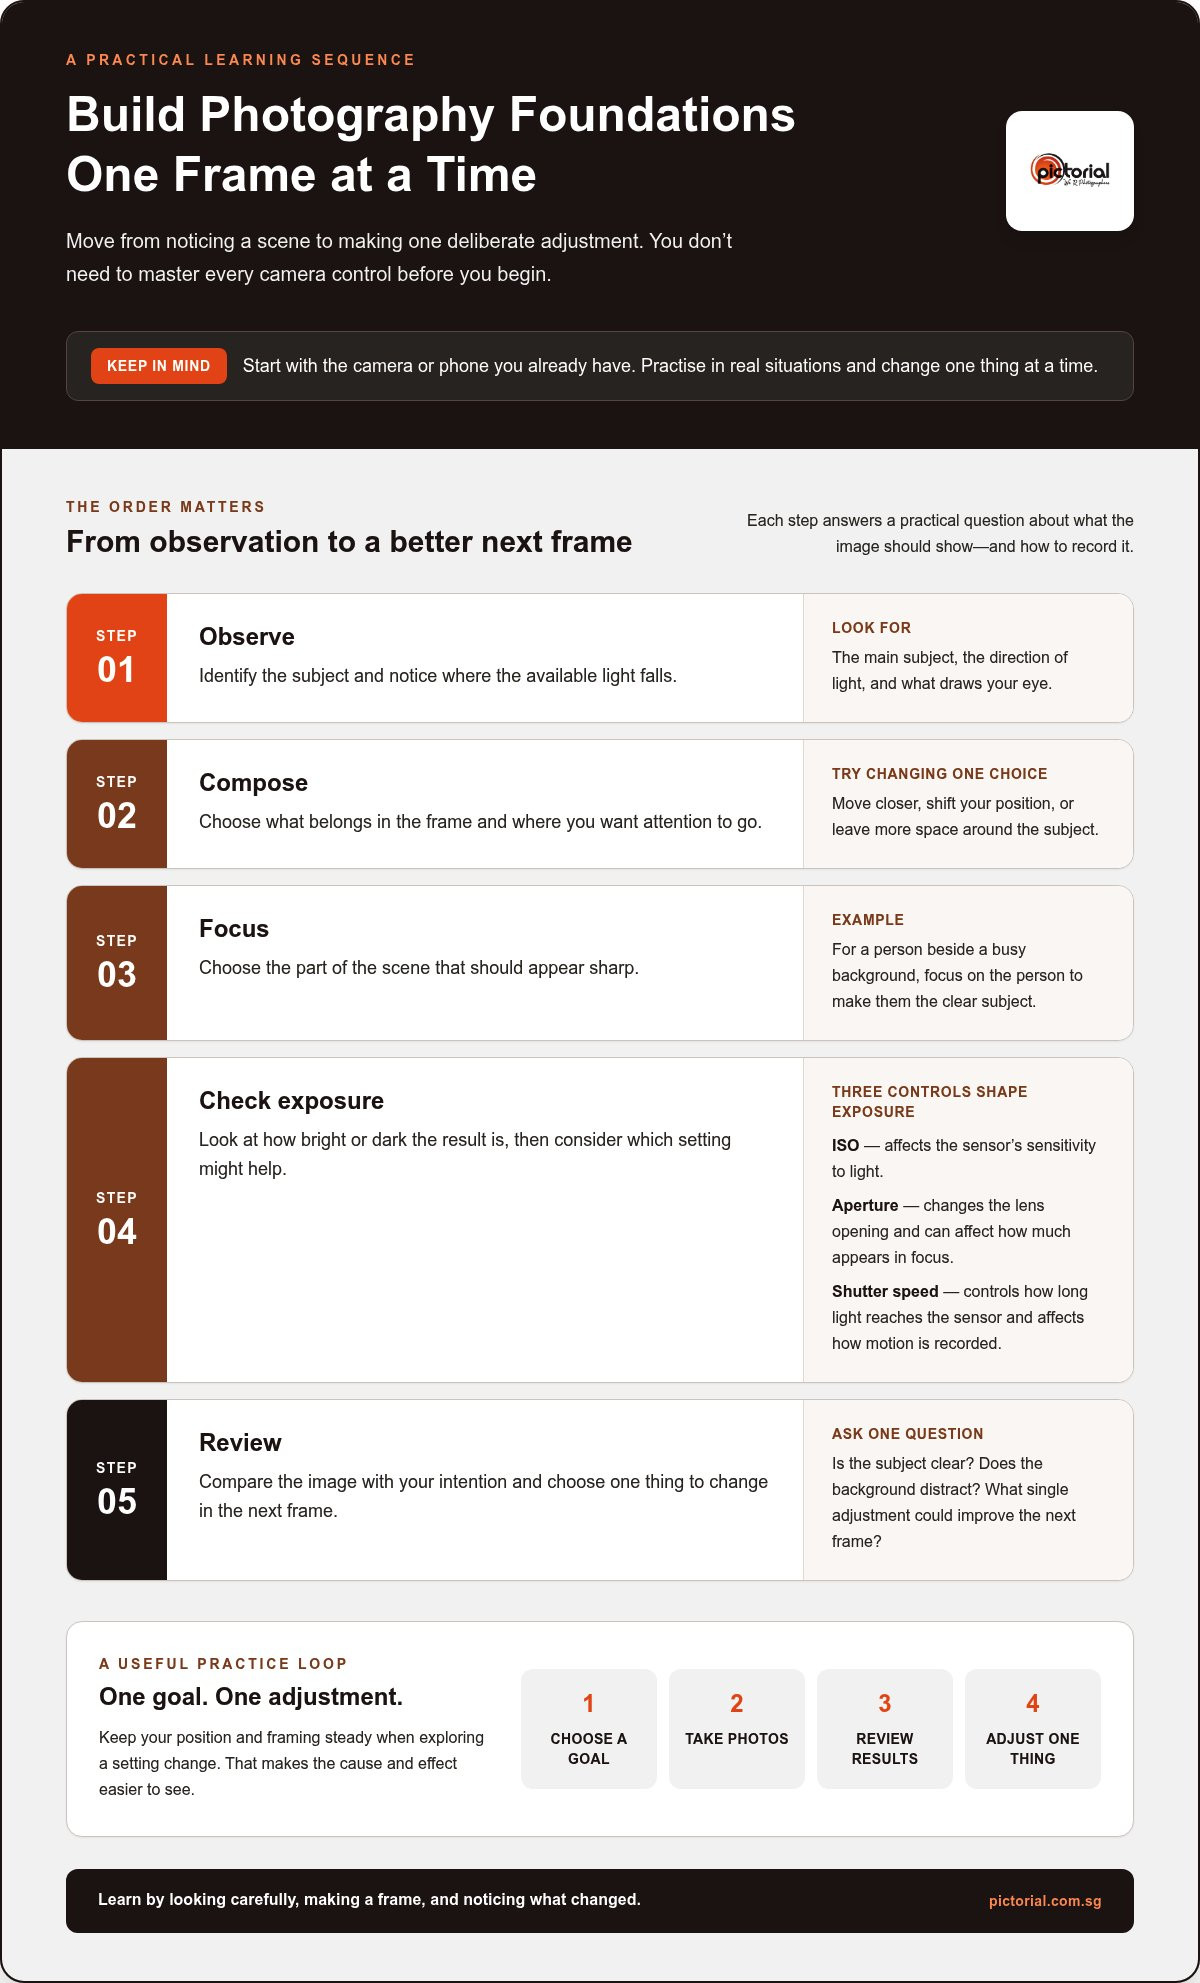
A clear learning order makes camera controls easier to understand because each skill answers a practical question: what should the image show, and how can you record it? Work through one step at a time. You’ll have more to notice and adjust when you review each frame.
- Observe: Identify the subject and notice where the available light falls.
- Compose: Decide what belongs in the frame and where you want the viewer’s attention to go.
- Focus: Choose the part of the scene that should appear sharp.
- Check exposure: Look at how bright or dark the result is, then consider which setting might help.
- Review: Compare the image with your intention and choose one thing to change in the next frame.
Learn to notice light and compose a clear frame
Before changing settings, study the subject, its background and the light available. Ask yourself what should draw the eye. Take several frames of the same scene, changing just one compositional choice each time: move closer, shift your position, or leave more space around the subject. When you review the images, notice what catches your attention and what competes with it. This simple comparison helps you make framing choices with purpose.
Understand focus and exposure controls without overload
Focus is your choice of what appears sharp in the frame. In a photograph of a person beside a busy background, for example, focusing on the person helps make them the clear subject. Exposure describes how light or dark the image appears, and three controls influence it: ISO affects the sensor’s sensitivity to light, aperture changes the lens opening and can affect how much of the scene appears in focus, and shutter speed controls how long light reaches the sensor, affecting how motion is recorded.
ISO, aperture and shutter speed work together to control exposure, while each also shapes a different quality of the photograph. You don’t need to adjust all three at once. Photograph a moving subject, then try a different shutter speed and compare how its movement looks. Keep your position and framing steady so the setting change is easier to see. The aim is to notice cause and effect, not to follow an unsupported numeric rule.
Once these ideas feel familiar, explore Exit Auto Mode: A Beginner’s Guide to Manual Control for a deeper look at camera settings. If you’d rather practise with guidance, Pictorial’s photography course options offer a way to continue building your skills through practice.
Self-study, phone practice, or a photography course: how do they compare?
There isn’t one right way to learn. The best fit depends on how you like to practise, how much structure you want, and whether you can tell what to change after a photograph doesn’t work as intended. Self-study lets you set the pace, phone practice makes it easy to try ideas in everyday situations, and guided learning adds a person who can respond to questions as they arise.
| Learning approach | Flexibility | Feedback | A good fit if you… |
|---|---|---|---|
| Self-study | Choose your own topics and pace | You create your own review routine | Enjoy exploring independently and can set practice goals |
| Phone practice | Try ideas during ordinary daily activities | Compare your own images and adjust | Want an accessible way to work on framing, light and focus |
| Guided instruction | Follow a planned learning experience | Ask questions and get help applying ideas | Prefer learning through demonstration and practical feedback |
When is learning photography on your own a good fit?
Self-study can work well if you’re curious and comfortable setting your own routine. Rather than saving a stream of unrelated tips, choose one skill for an outing, such as framing a subject against a less distracting background. Take a few photographs, review them, and note what you would change next time. A simple record of the light, camera settings and results can help you spot patterns as you practise.
Phone practice can be part of that routine. Use familiar subjects, such as a meal, a plant or a street scene, to explore how your position and framing affect the image. The phone keeps the exercise close at hand, while the habit of making and reviewing photographs is what helps you improve. If you want to learn photography from scratch on your own, make space for reflection as well as shooting. Reading explains an idea; reviewing your own frames helps you test it.
When can structured, hands-on guidance help?
Guidance can be useful when a concept makes sense in theory but feels hard to apply in a real scene. You can ask a question as you work, try a suggested adjustment, and see how it changes the photograph. Pictorial’s practical outdoor classes have a maximum of three participants, allowing space for individual guidance while learners practise in real shooting situations. For more on learning through direct experience, see Why Practical Outdoor Shooting Outperforms Theory.
Choose a format by noticing what tends to keep you moving: independent goals, convenient phone exercises, or support while you photograph. These approaches can also complement one another. You might explore on your own, practise with a phone, then use structured instruction to work through questions that come up. Pictorial’s hands-on photography courses offer a guided way to put concepts into practice.
Create a beginner practice plan that turns camera knowledge into skill
Knowing what a setting does is useful, but confidence grows when you make a choice, see its effect and decide what to try next. Keep practice manageable with a repeatable loop: choose one goal, make a small set of images, review the results and adjust. You can use the same routine with a phone or a camera, indoors or outside.
Changing one variable at a time makes practice easier to evaluate because you can connect a difference in the image to the choice you changed. If you move closer and change your focus at the same time, it may be harder to tell which adjustment made the subject stand out. Keep other choices steady where you can, and use each outing to explore one idea.
Use short exercises to practise one decision at a time
Choose a familiar subject, such as a fruit bowl, and make a few frames from different angles and distances. Keep the subject in view, but notice how the background changes as you move. On another outing, photograph it in different available light, perhaps near a bright window and later in softer light. Before changing settings, check whether the subject is in focus and whether anything behind it competes for attention.
- Composition: Photograph the subject from eye level, then from above. Compare which view makes its shape clearest.
- Light: Keep your framing similar and observe how light from a different direction changes the scene.
- Focus: Check which part of the subject looks sharp, then consider whether that’s where you want the viewer to look.
- Exposure: Once focus and framing feel intentional, make one considered adjustment and compare the result.
Review photographs to decide what to practise next
After an exercise, select a small group of photographs rather than judging every frame. For each one, ask whether it matches your goal, what draws your eye first and what distracts you. Name one strength, such as a clear subject, and one next improvement, such as simplifying the background. This keeps review specific and gives your next practice session a clear direction.
Return to the same subject after some time has passed. Compare the newer photographs with your earlier attempts. You may notice that you choose a cleaner background more quickly or pay closer attention to light before pressing the shutter. Those small changes are signs of growing control. If you want to keep building a steady routine, How to Improve Photography Skills: A Practical Guide offers a useful next topic to explore.
To learn photography from scratch, you don’t need to practise every skill in every session. Repeat a simple exercise, keep a note of what you noticed, and choose just one next step. Consistent, focused practice helps turn camera knowledge into decisions you can make with confidence.
Choose a beginner photography course that fits your starting point
Think about how much structure you want before choosing a first course. If you’re curious about photography but would rather try a short introduction before committing to a longer learning experience, the Photography Starter Session offers a focused starting point. If you’d prefer several sessions to return to ideas and practise over time, the Basic Photography Course may suit you better.
Both are beginner options for learners aged nine and above. Pictorial’s classes have a maximum of three participants, and each course includes a Certificate of Completion. If you need to use a camera during lessons, a Complimentary camera loan (if needed) is offered with every course.
Is the Photography Starter Session a suitable first step?
The Photography Starter Session is one three-hour session for people who want to explore photography in a short, guided experience. It may suit you if you’re still deciding how far you want to take your learning, or if you’d like to get started without first having your own camera. The minimum age is nine.
For group sessions, availability is Monday-Sunday, 11 AM-2 PM or 2 PM-5 PM. Private sessions are available flexible daily, 8 AM-7 PM. The single-session format gives you a chance to begin with guidance and practical experience, then decide what you’d like to practise next.
When might the Basic Photography Course fit better?
Choose the Basic Photography Course if you’d value more time across several sessions to build confidence gradually. It consists of three sessions of two hours each, and the minimum age is nine. Instead of fitting your first experience into one session, you have separate opportunities to work on photography and return to what you’re learning.
Group availability is Monday-Sunday, 11 AM-1 PM or 2 PM-4 PM. Private availability is flexible daily, 8 AM-7 PM. The course includes a Certificate of Completion. You can explore the Basic Photography Course for beginners to see how this option fits your starting point.
In short, the Starter Session is a brief introduction, while the Basic Photography Course provides three sessions for learners who want a longer beginning. Neither choice needs to define your whole photography journey. Start with the format that feels manageable, then build from what you learn. If you’re ready to compare other ways to learn photography from scratch, explore the available photography learning options and choose a next step that feels right for you.
Take your next step with confidence
Your first goal doesn’t need to be a perfect photograph. Choose something you enjoy noticing, make time to practise, and let each attempt show you what to try next. That steady curiosity is a useful way to learn photography from scratch, and it can grow into a personal style as your experience deepens.
If learning alongside an experienced photographer would help you stay engaged, Pictorial offers a practical setting to keep developing. Founded in 2005 and led by professional photographer Keith, the school has taught more than 20,000 students. Its small classes and outdoor guidance give learners room to work through real photographic situations with support.
You don’t have to settle every question about your photography goals before beginning. A manageable first step can help you discover what you enjoy and where you’d like to grow next. Give yourself permission to start simply, practise with care, and build from there.
Every photograph you make is a chance to notice something new. Keep going at your own pace, and let confidence follow practice.
Frequently Asked Questions
Can I learn photography from scratch without owning a camera?
Yes. You can begin with a smartphone to practise framing, noticing light and choosing what to include in a photograph. If you want to learn with a camera during lessons, Pictorial offers a complimentary camera loan if needed with every course. Start by photographing familiar subjects and reviewing the results, so you can identify the kinds of images you’d like to make before deciding what equipment to use.
How long does it take to learn the basics of photography?
There’s no fixed timeline because progress depends on how often you practise and which skills you want to develop. You might understand a camera control quickly, but using it confidently in changing situations takes repeated practice. Set a small goal for each session, such as making a clear photograph in backlight, then revisit it later. Comparing your attempts over time is a more useful measure than expecting to master everything at once.
Is it better to learn photography on my own or take a course?
Either can work, and you can combine them. Learning independently lets you follow your curiosity and practise when it suits you, but you’ll need to create your own way to assess results. A course can offer demonstrations and a chance to ask questions while photographing. If you’re unsure, try a short independent exercise first. Notice whether you can identify what to adjust, or whether feedback would help you move forward.
What should a beginner learn first in photography?
Begin with the decisions you make before pressing the shutter: what is the subject, what should stay outside the frame, and where should attention fall? Then check that the important detail is in focus. Once those choices feel more deliberate, explore exposure controls and observe how they affect the result. This order keeps technical terms connected to visible changes, making them easier to understand than studying settings in isolation.
Can I learn photography using a smartphone?
Yes. A smartphone is a practical tool for exploring composition and light because you can carry it into everyday situations. Try photographing the same subject from eye level and from above, then compare which angle communicates its shape more clearly. You can also practise tapping different parts of the screen to see how focus or brightness changes. These exercises build observation skills that remain useful if you later use a dedicated camera.
Do I need to learn manual mode to take good photographs?
No. Automatic modes can help you concentrate on timing, framing and the scene in front of you, especially at the beginning. Manual control becomes useful when you want to guide how the camera handles light, movement or background sharpness. You can learn it gradually by changing one control and observing the result, rather than switching every setting at once. The aim is to choose the mode that serves the photograph you want.
What is the best first photography course for a complete beginner?
The best fit depends on whether you want a brief introduction or more time to learn across several lessons. Pictorial’s Photography Starter Session is one three-hour session for learners aged nine and above. The Basic Photography Course offers three sessions of two hours each, also with a minimum age of nine. Choose the shorter format to explore first, or the multi-session option if you prefer to return to your learning over time.
Disclaimer
© Pictorial | All Rights Reserved.