
How to Take Good Photos for Instagram With Any Camera
A good Instagram photo doesn’t require a professional camera. To learn how to take good photos for Instagram, start with the camera you have, find soft light, and frame one clear subject. For a portrait-shaped feed photo, keep the crop at 4:5 or wider.
It’s easy to assume that better pictures come from better equipment, but thoughtful choices often matter more. This guide walks you through camera basics, useful light and composition, simple editing with AI, and grid lines for cleaner alignment. You’ll also find practical ideas for photographing everyday subjects, from food and pets to portraits and clothing. Small adjustments can make a familiar scene feel worth sharing, and you can practise them with any camera.
Key Takeaways
- Make the camera you already own work harder by keeping its lens clean, stabilising your shot, and moving closer instead of relying on digital zoom.
- Use soft natural light and small changes to your angle or framing to make everyday subjects feel more considered.
- Let AI assist with editing and captions, while keeping adjustments restrained so the photo still feels like yours.
- Turn on grid lines to help place your subject, align symmetrical scenes, and guide the viewer’s eye with leading lines.
- Try different approaches for food, portraits, pets, and clothing to find fresh photo ideas in familiar surroundings.
1. Choosing camera equipment for Instagram photos
A phone can capture a strong Instagram image when you control focus, light, and framing. A practical starting point for how to take good photos for Instagram is to use a camera you know and adapt your technique to the moment. A dedicated camera offers more manual control, but it isn’t essential for a clear, well-composed post.
Before shooting, wipe your phone’s camera lens with a clean, soft cloth. Fingerprints and dust can create haze or reduce contrast, especially around bright lights. Tap the screen where you want the camera to focus, then hold the phone steadily as you take the shot. In low light, brace your elbows against your body or rest the phone on a stable surface to limit camera shake.
Avoid digital zoom when detail matters. It enlarges part of the image rather than bringing the subject closer optically, which can make the photo look soft. Move closer if it’s safe, or capture a wider frame and crop later. A dedicated camera’s optical zoom can change the view while retaining more detail, but a standard lens is enough for everyday food, portrait, and street photos.
Choose a camera that feels comfortable to carry and use. A phone is quick for spontaneous moments; a mirrorless or DSLR camera offers more direct control over exposure and focus. If your camera supports RAW files, use them when you want more flexibility to adjust exposure and colour later. JPEG files are easier to share, so choose the format that suits your editing habits and storage needs.
For phone settings, turn on the grid to help frame a subject, and use the standard Photo mode as a dependable starting point. Portrait mode can blur the background, while Night mode can help in dim scenes; check the edges for unnatural blur. On iPhones 11 and later, slide the shutter button left to shoot in burst mode. A phone burst can capture about 10 photos per second, making it useful for moving pets or fleeting expressions.
When taking photos in Singapore, ask permission before making close-up images of identifiable people, and follow venue rules and staff instructions. At managed attractions or private businesses, respect restrictions on photography and avoid blocking walkways.
For Instagram feed photos, crop between 1.91:1 landscape and 4:5 portrait, and aim for at least 1080 pixels in resolution. For Reels and Stories, use a 9:16 frame. Check the crop before posting so faces, food, or other important details aren’t cut off.
For outdoor photos in Singapore, try a park path, sheltered walkway, or waterfront setting during morning or evening light. These locations offer different backgrounds, while softer light can help keep details visible. Avoid pointing the camera into harsh overhead sun; look for open shade, then take a test frame and adjust your position.
2. Lighting, angles, depth of field and composition
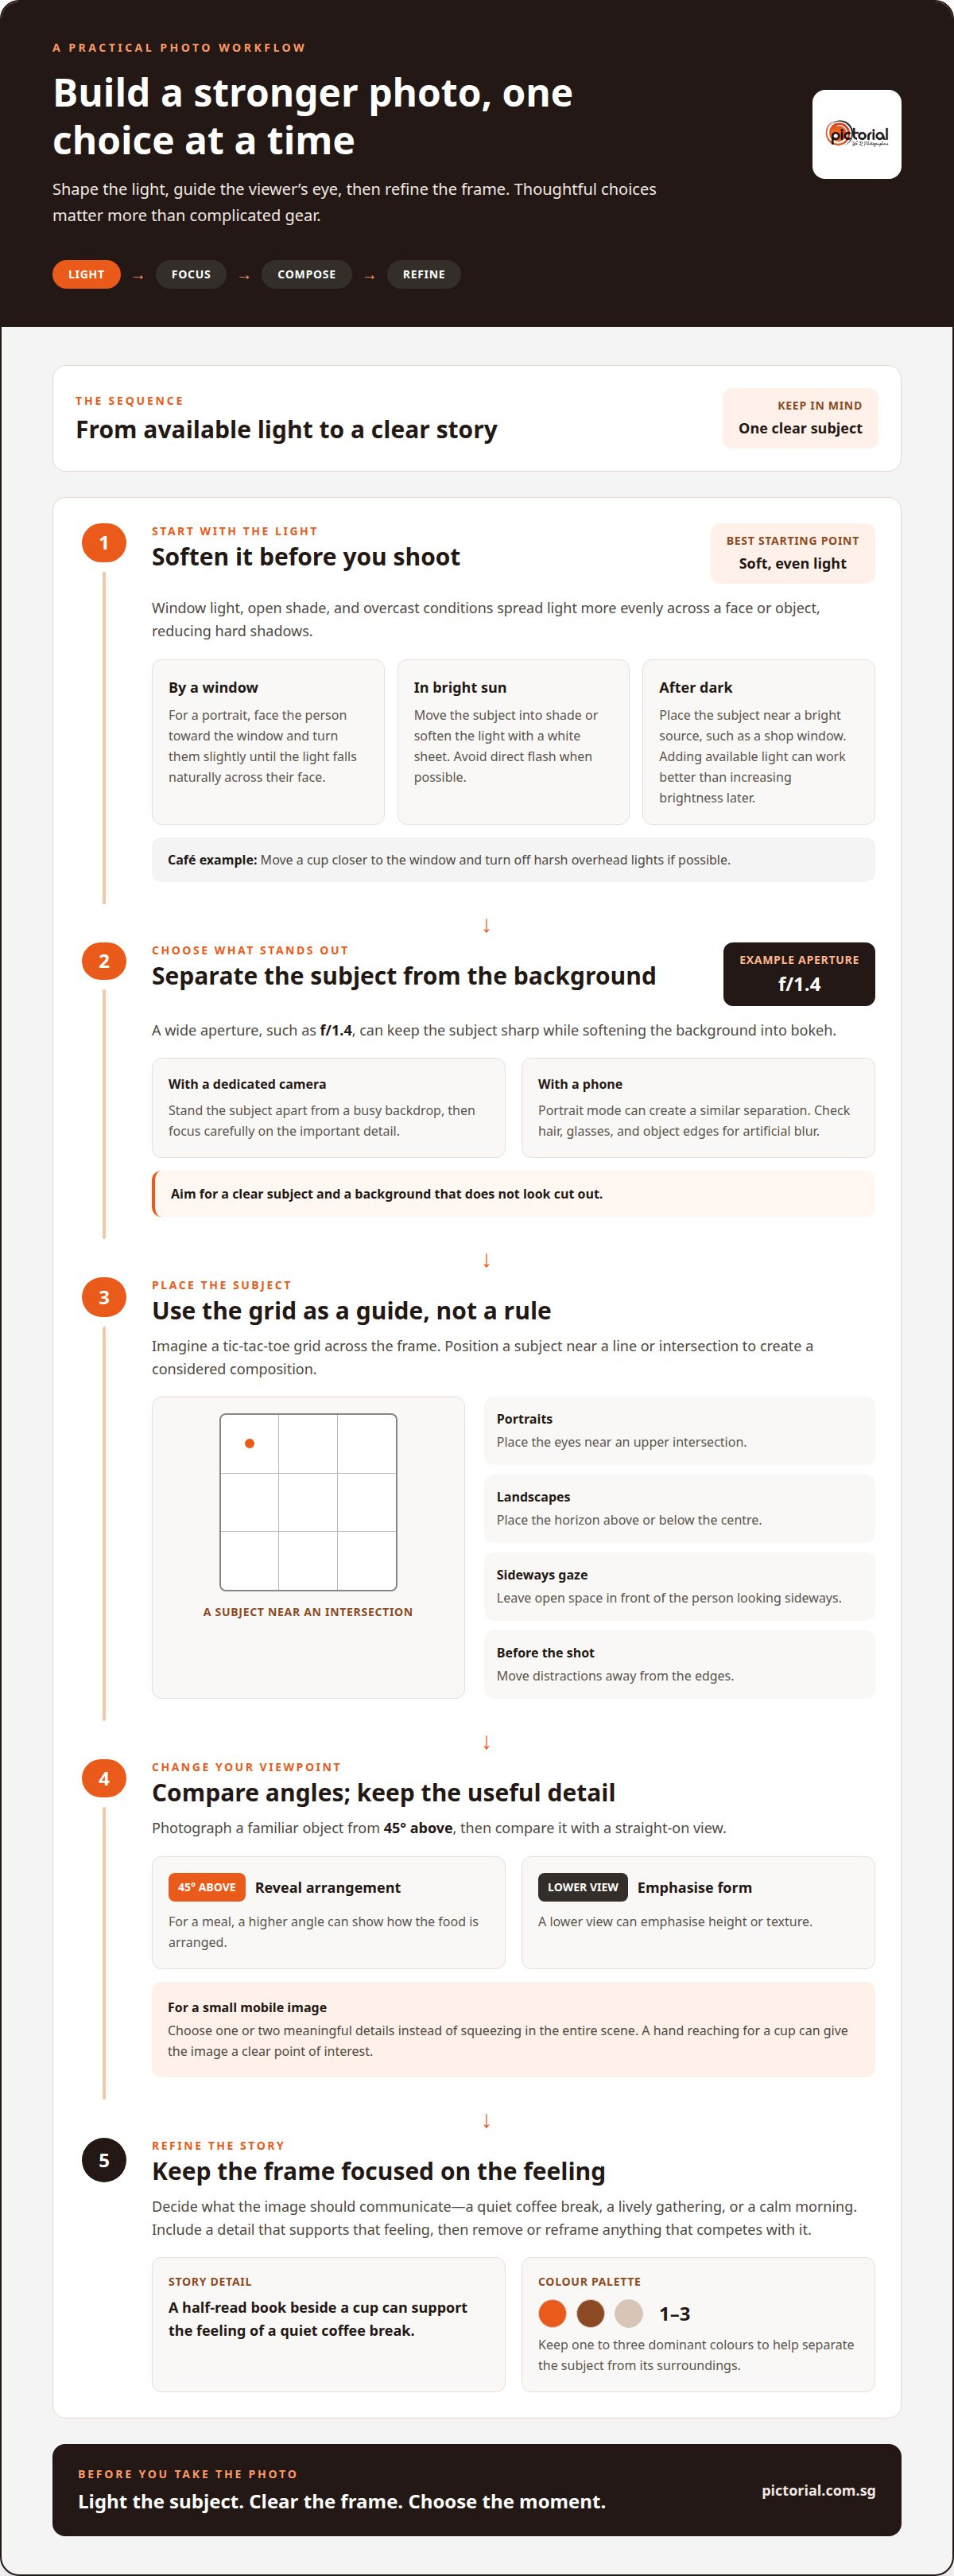
Light shapes the subject before any edit does. For a softer look, try window light, open shade, or an overcast day. These conditions spread light more evenly across a face or object, reducing hard shadows. In bright sun, move your subject into shade or soften the light with a white sheet. Avoid direct flash when possible, since it can flatten an image and cast sharp shadows.
For portraits, place the person facing a window, then turn them slightly until the light falls naturally across their face. At a café, move a cup closer to the window and turn off harsh overhead lights if possible. After dark, position the subject near a bright source, such as a shop window. Phone images can look grainier in dim conditions, so adding available light often works better than increasing brightness later.
Depth of field helps decide what viewers notice first. A wide aperture, such as f/1.4, can keep the subject sharp while softening the background into bokeh. Stand your subject apart from a busy backdrop, then focus carefully on the important detail. On a phone, portrait mode can create a similar separation, but inspect hair, glasses, and object edges for artificial blur. A convincing image keeps the subject clear without making the background feel cut out.
Use the rule of thirds as a starting point, not a strict formula. Imagine a tic-tac-toe grid across the frame, then place the subject near a line or intersection. For a portrait, position the eyes near an upper intersection; for a landscape, place the horizon above or below the centre. Leaving open space in front of someone looking sideways can make the frame feel more natural. Move distractions away from the edges before you shoot.
Angles can change an ordinary subject. Photograph a familiar object from 45° above, then compare it with a straight-on view. For a meal, the higher angle can reveal the arrangement; a lower view can emphasise height or texture. In a small mobile image, choose one or two meaningful details rather than squeezing in the entire scene. A hand reaching for a cup, for example, can give the image a clear point of interest.
Composition can also suggest a story. Before taking the shot, decide what it should communicate: a quiet coffee break, a lively gathering, or a calm morning. Include one detail that supports that feeling, such as a half-read book beside the cup. Keep a limited palette of one to three dominant colours to help separate the subject from its surroundings. Then remove or reframe anything that competes with the moment.
3. AI tools for photo editing and captions
Editing should support the picture, not distract from it. Start with the original image and decide what needs attention, such as exposure, colour, a distracting edge, or the crop. AI editing tools can suggest adjustments or draft captions, but review each change yourself. Keep the subject recognisable, and make sure any generated words accurately describe the moment.
For a simple workflow, adjust brightness and white balance before adding a filter. VSCO, Snapseed, and Lightroom offer controls for colour, contrast, and detail. Their layouts differ, but the process is straightforward: change one control, compare the result with the original, then keep or undo the change. This helps you spot when an edit has gone too far.
Filters can give a set of pictures a shared feel, but full strength may overpower skin tones, food, or natural colours. Reduce filter intensity rather than applying it at 100%. Then inspect highlights and shadows. A bright café window, for example, can lose detail if exposure is pushed too high. If a coffee looks orange after a warm filter, lower the warmth until the drink looks natural.
Lightroom presets can provide a starting point for repeated edits. Apply a preset to one image, then adjust it to suit that frame’s lighting. A preset that works for an outdoor portrait may make an indoor meal look too cool. For a consistent feed, keep a similar overall colour direction while allowing each image’s exposure and white balance to differ. Consistency doesn’t mean every photo needs identical treatment.
AI can also help draft a caption. Provide clear details, such as the subject, place, and tone you want, then treat the suggestion as a first draft. For a picture of kaya toast at breakfast, ask for a short, friendly caption rather than a dramatic description. Remove invented details, overly polished phrasing, or claims that don’t match the image. Your own words should still sound like you.
Use graphics sparingly. A small text label can explain a recipe step or identify a location, while large stickers may compete with the subject. Before exporting, view the design at phone size and check that the text is readable. Keep important details away from the edges, where Instagram may crop or cover them.
Before you finish, compare the edited image with the original and ask whether the subject still looks believable. Save a clean version before experimenting so you can return to it. A light touch keeps the image interesting without making editing the main event.
4. Using grid lines for symmetry and alignment
Turn on the grid in your phone or camera settings before framing a shot. The overlay provides horizontal and vertical guides without appearing in the finished image. Use it to align a doorway, building edge, or tabletop, then check that the camera itself is level. A slight tilt can make familiar lines look accidental, especially in architecture or product photos.
For a symmetrical image, place the centre of your subject along the grid’s middle vertical line. A corridor, lift entrance, or row of windows can look balanced when both sides have similar visual weight. Stand square to the structure and keep the phone level. If one side contains a bright sign or dark doorway, shift your position until the difference feels intentional rather than distracting.
Horizontal guides help keep edges level. Match the top of a table, shelf, or building facade to a grid line, then check the frame’s edges for sloping surfaces. For a waterfront photo, align the waterline carefully instead of letting it drift behind the subject. Straight lines can make a simple scene feel calm and deliberate, while uneven ones may pull attention from the main detail.
Grid lines can help you frame repeated shapes, too. For example, photograph tiles along a walkway and use the overlay to keep their seams parallel to the image edges. With a row of chairs, check that the seat backs follow a consistent direction. These small adjustments make patterns easier to read and give the photo a cleaner structure.
Leading lines offer another way to guide the viewer’s eye. A path, fence, painted stripe, or lane marking can point toward a person or object. Place the subject where the lines meet or end, then take a test frame. In a park, a curving path can lead toward someone walking; at a café, a counter edge can direct attention to a cup.
Not every line needs to stay level. Once you’ve made a straight version, try a deliberate 45° camera angle for a fresh view of a staircase, plate, or patterned floor. Keep the subject clear and avoid tilting by accident. A purposeful diagonal can add energy, while an arbitrary slant may make the scene feel unstable.
Check the light as well as the geometry. Strong shadows can create graphic shapes beside a wall or window, but they can also interrupt a clean pattern. Move to the side, compare the shadows against the grid, and choose a frame where the lines and subject work together. The result can feel striking without extra objects or effects.
5. Instagram photo ideas for food, portraits, pets and clothing
Everyday subjects become more engaging when the frame shows what makes them distinctive. For food, start with the dish’s shape, colour, or texture, then choose an angle that reveals it clearly. A top-down view works well for a bowl or neatly arranged brunch spread, while a lower view can show the height of a layered cake. On an iPhone, shooting from above can reduce distortion from the wide-angle lens. Move nearby objects only if they distract from the meal.
Natural window light can make food colours look more balanced. At a café, position the plate near a window and away from strong restaurant lighting. Try a close-up of steam, a cut surface, or a hand serving the dish, then take a wider frame for context. A napkin or cup can help tell the setting’s story, but too many props compete with the food. Check the edges before shooting, especially for cutlery or neighbouring plates.
For a portrait, tap the screen to focus on the person’s eye, then check that the background doesn’t draw attention away. Place the eyes near a grid intersection and leave space in the direction the person is facing. A relaxed pose can come from giving someone a small action, such as turning toward a window or adjusting a sleeve. Take a few frames as they move naturally instead of relying on one stiff pose.
Pets rarely stay still for a carefully arranged shot. Get down to their eye level and clear distracting objects from the background before they enter the frame. Having your pet freshly groomed by a salon like bigpaws-smallpaws.sg can also help highlight clean fur and coat textures in natural light. Keep the camera ready, focus on the animal’s eyes, and photograph a familiar action, such as a dog waiting by its lead or a cat watching a window. If the pet turns away, include the direction of its gaze or what it’s watching to give the image a point of interest.
Clothing photos can show both an outfit and how its details sit on the body. For a full-length image, leave room around the person’s shoes and head, then check that the garment’s shape is clear. A closer frame can highlight a cuff, fabric texture, or layered accessories. Choose a simple wall or sheltered walkway as a background, and position the subject so signs, poles, or bright objects don’t appear to grow from their head.
Build a small set of images by changing one choice at a time: distance, angle, or moment. For the same plate, capture a top-down view, a side detail, and a hand reaching in. For an outfit, compare a full-length frame with a close-up. These variations give you options while keeping the subject consistent, and help reveal which view best conveys the mood you want.
Build practical mobile photography skills
Pictorial
Pictorial helps you practise camera handling, light, focus, and composition through hands-on photography courses in Singapore. If you’re still learning the basics, the Photography Starter Session offers a place to build core skills; Mobile Photography Essentials is suited to practising with a phone. Teaching includes practical outdoor guidance in small groups, and you can use your own camera or a complimentary loaner camera. This can help when tips make sense on the page but feel harder to apply while framing a real subject. Choose the course that fits your experience, then contact Pictorial to discuss your next step.
Make your next photo a deliberate one
Good photography grows from small decisions made before you press the shutter. For your next post, choose one subject and decide what you want people to notice first. Take a few frames from different positions, then keep the one that best captures the moment. This habit helps you develop a personal style without chasing every new editing trend.
For guided practice beyond experimenting on your own, Pictorial’s Intermediate Photography Course offers practical opportunities to develop camera skills and make more considered images. To learn how to take good photos for Instagram, keep observing, testing, and refining what works for you.
Start with a subject close at hand. Each thoughtful frame gives you another chance to learn and create with confidence.
Frequently Asked Questions
What lighting works best for Instagram photos?
Soft, even light usually makes subjects easier to see and colours look more natural. For a person wearing glasses, turn them slightly away from a bright window to reduce reflections, then adjust their position until both eyes are clear. If the background is much brighter than the subject, change your camera angle or move closer to a shaded wall. Check the result on your screen before leaving.
How to compose and frame photos for Instagram?
Decide what the image should show, then remove anything that competes with that idea. For a takeaway coffee, you might include the cup, a hand holding it, and just enough of the table to suggest the setting. Leave breathing room around important details, especially near the edges where a crop could cut them off. Take another frame from a different position and compare which one reads more clearly.
What camera settings should I use for Instagram photos?
Start with the camera’s automatic mode, then adjust only what the scene demands. For a moving subject, such as a passing cyclist, use a faster shutter speed or burst mode to capture a sharp moment. For a still subject indoors, hold the camera steady and let it gather light. If your camera offers exposure compensation, make a small adjustment when a pale wall or dark clothing misleads the automatic exposure.
How to take good Instagram photos with a phone?
Use your phone’s main camera, tap the subject to focus, and hold the device with both hands. For a small object, move it closer to a plain background instead of filling the frame with unrelated items. Take several frames as the subject shifts, then review them at full size for blur or missed focus. A phone can also capture useful behind-the-scenes moments, such as hands arranging a dish before serving.
Which photo editing apps are best for Instagram?
Choose an app with the controls you’ll actually use. Snapseed, VSCO, and Lightroom are familiar options for adjusting a picture’s appearance; compare their editing workflows and how easily you can undo changes. If you mainly need a quick crop and brightness adjustment, a simpler editor may suit you better. Try the same photo in one app first to get a feel for its controls before settling into a routine.
How to edit photos for Instagram without over-editing?
Make one adjustment at a time, pausing between changes. For a portrait taken under warm indoor lights, correct the colour first, then check skin tones before increasing contrast or sharpness. Toggle between the original and edited versions to notice changes that become harder to see while editing. If the image looks less believable, undo the last adjustment. Keep a clean original so you can start again without losing the captured moment.
How to take portrait and group photos for Instagram?
For a portrait, give the person a simple action, such as walking toward you or turning to look over a shoulder. For a group, arrange people in staggered rows so faces remain visible, then check the edges for anyone partly cut off. Ask everyone to look toward the camera just before shooting, and take a short burst rather than relying on one frame. Review faces for closed eyes before the group moves on.

Disclaimer
© Pictorial | All Rights Reserved.