
Exit Auto Mode: A Beginner’s Guide to Manual Control
Your camera is a powerful tool, but when you leave it on the green “Auto” setting, you’re letting a computer chip make all the creative choices for you. It’s often frustrating when your device delivers a blurry shot of a moving subject or a photo that’s inexplicably dark despite the bright Singapore sun. If you’ve been wondering how to get out of auto mode camera settings without feeling overwhelmed, you’re in the right place. Most beginners feel like the camera is smarter than they are, but the truth is that your eyes and your vision are far more capable than any internal sensor.
It’s completely normal to feel intimidated by technical terms like f-stop or ISO. We’ve all stood there, staring at the dials and worrying that one wrong turn will ruin the moment. This guide is designed to dismantle that anxiety and show you that manual control isn’t about complex math; it’s about directing a story. You’ll learn how to stop letting the hardware dictate the results and start taking the sharp, well-exposed photos you’ve always wanted. We’ll walk through the simple relationship between aperture, shutter speed, and ISO, giving you the practical confidence to finally turn that dial and take charge of your craft.
Key Takeaways
- Understand why Auto mode often struggles with high-contrast scenes and why taking back control is the secret to professional results.
- Discover how to get out of auto mode camera settings by mastering the Exposure Triangle, the simple relationship between light, speed, and sensitivity.
- Learn to use semi-automatic modes as a practical bridge to full manual, allowing you to focus on creativity while the camera handles the technical math.
- Focus on getting sharp, well-exposed images directly in-camera, reducing your reliance on post-capture editing or Photoshop.
- Shift your focus from technical theory to hands-on outdoor practice to build the muscle memory needed for effortless shooting.
Beyond the Green Square: Why Auto Mode Limits Your Camera
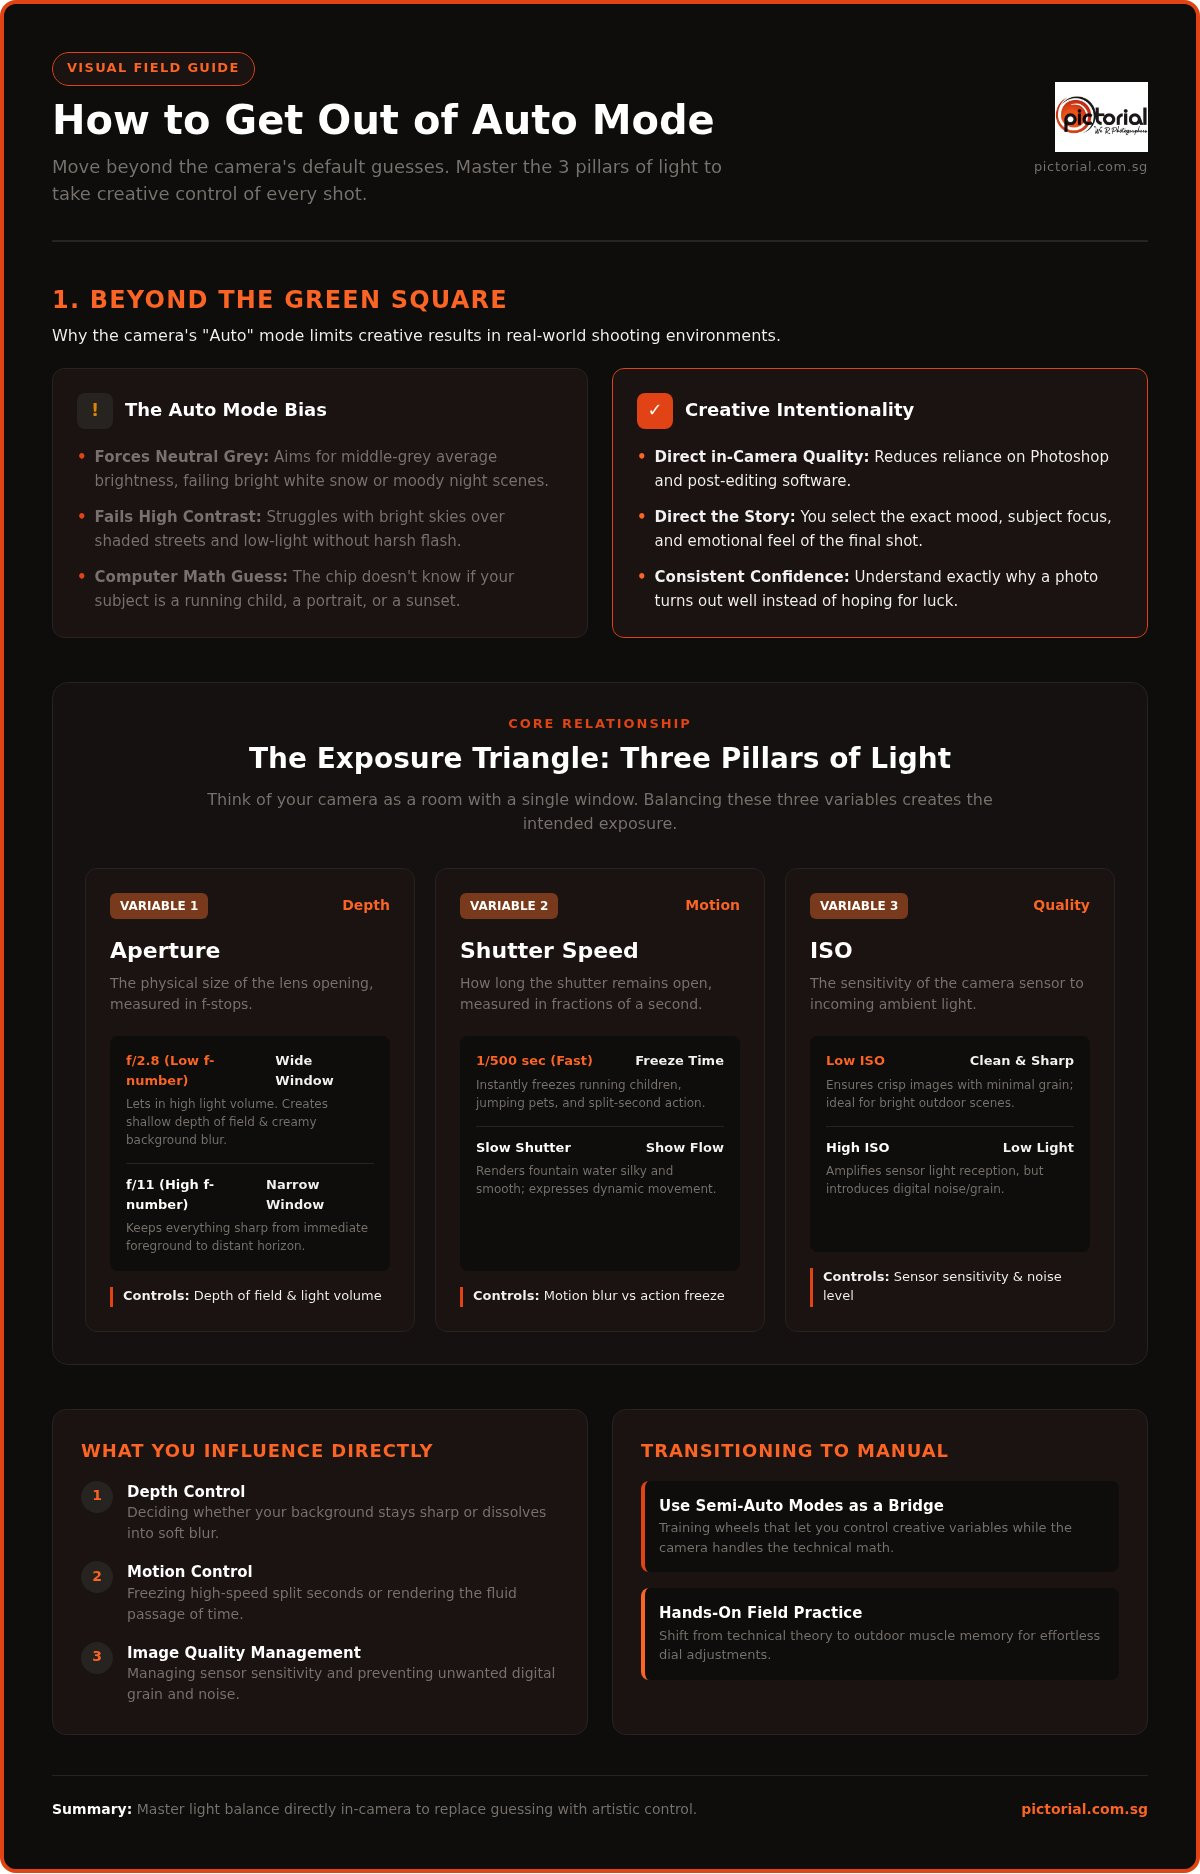
Turning your camera dial to the green “Auto” square feels like a safe choice, especially when you are just starting out. It acts as a digital safety net, promising to handle the technical details so you can focus on the subject. However, that little square is actually a series of compromises. When you use Auto, you are asking a computer chip to make a best guess based on average lighting conditions. It doesn’t see the beauty of a sunset or the specific mood you want to capture; it only sees a math problem to be solved. Learning how to get out of auto mode camera settings is about moving from being a passenger to becoming the pilot of your own creative vision.
Most beginners feel frustrated when their photos come out blurry or the colors look “off,” often blaming their own lack of skill. The truth is usually simpler: the software reached its limit. Auto mode frequently fails in high-contrast scenes, like a bright sky over a shaded street, or in low-light environments where it might force a harsh, unflattering flash. The professional look you admire, characterized by creamy background blur or perfectly frozen action, isn’t a result of a “smarter” camera. It’s the result of a photographer making intentional decisions that the software simply isn’t programmed to prioritize.
The Illusion of the Smart Camera
Your camera’s light meter is programmed with a specific bias: it wants the world to be a neutral, middle-grey. It doesn’t understand that snow should be brilliant white or that a night scene should be deep and moody. It tries to pull every scene toward an average brightness. This is why your camera doesn’t know if you’re shooting a still portrait or a racing car. It just wants to ensure there is enough light hitting the sensor. By understanding exposure, you begin to see that a “correct” exposure according to the camera might be a “creative” failure for the artist. Taking control allows you to decide what matters most in the frame.
Taking Back Control of Your Vision
In Auto mode, the camera hides three critical variables from you: aperture, shutter speed, and ISO. It balances these behind the scenes to prevent a total disaster, but it also strips away your ability to style the shot. When you step away from Auto, you gain the power to influence three specific outcomes:
- Depth: Deciding if the background is sharp or softly out of focus.
- Motion: Choosing to freeze a split-second moment or show the graceful flow of movement.
- Quality: Managing how much “noise” or grain appears in your final image.
The emotional payoff of this control is significant. Instead of crossing your fingers and hoping the camera “gets it right,” you’ll have the confidence to know exactly why a photo looks the way it does. This grounded approach reduces your reliance on editing software later, as you’ll be capturing the soul of the image directly in-camera.
The Exposure Triangle: Mastering the Three Pillars of Light
Think of your camera as a room with a single window. To get the light just right, you need to manage three specific things. You don’t need to be a math genius to understand how to get out of auto mode camera settings; you just need to understand how light behaves. These three settings, Aperture, Shutter Speed, and ISO, work in a constant, delicate balance. If you change one, you usually have to adjust another to keep the light consistent. When these three pillars are in harmony, you achieve a perfect exposure that looks exactly how you intended.
Aperture: Controlling Your Focus and Background
Aperture is the size of the lens opening, measured in f-stops. Think of it as the physical size of the window in our analogy. A wide window, represented by a low f-number like f/2.8, lets in a lot of light and creates a shallow “depth of field.” This is how you get that beautiful, creamy background blur that makes a portrait pop. Conversely, a narrow window like f/11 keeps everything from the foreground to the distant horizon in sharp focus. Aperture determines how much of your scene is in focus while simultaneously controlling the volume of light entering the lens.
Shutter Speed: Freezing Time or Showing Motion
If aperture is the window size, shutter speed is how long you leave the shutters open. It’s measured in fractions of a second. To freeze a child running or a pet jumping, you’ll want a fast speed like 1/500. To make the water at a local fountain look silky and smooth, you’d use a slower speed. A vital tip for beginners is the “1/60 rule”: try not to shoot slower than 1/60 of a second when holding the camera by hand. Anything slower will likely show blur from your own natural hand tremors, ruining an otherwise great shot.
ISO: Managing Your Camera’s Sensitivity
ISO is your sensor’s sensitivity to the light that makes it through the lens. In bright Singapore sunlight, you’ll want a low ISO like 100 to keep your images clean and crisp. When you move indoors or shoot at night, you might need to increase the ISO to 1600 or higher to help the camera “see” in the dark. The trade-off is “noise,” which looks like tiny grains or speckles in your photo. Staying as low as possible ensures the highest image quality and keeps your photos looking professional.
Balancing these three elements is the core of great photography. While it sounds technical on paper, it becomes second nature once you see it in action. If you’re feeling stuck, a Photography Starter Session can help you visualize these concepts in a real-world setting without any of the stress.
Semi-Auto Modes: The Training Wheels for Manual Success
Jumping straight from the green square to full Manual mode can feel like trying to fly a plane mid-flight. It is often better to take a step-by-step approach that builds your confidence without the stress of missing a perfect moment. Semi-automatic modes like Aperture Priority and Shutter Priority act as a vital bridge. They aren’t just for beginners; a poll of photography enthusiasts showed that 38% preferred Aperture Priority for their daily work, while only 30% used full Manual. These modes allow you to master one creative variable at a time while the camera’s computer manages the rest of the exposure. If you’ve been wondering how to get out of auto mode camera settings without feeling overwhelmed, these modes are your best friends.
Aperture Priority (A/Av): The Portrait Secret
When you select Aperture Priority (A or Av on your dial), you choose the f-stop, and the camera automatically adjusts the shutter speed. This is arguably the most popular mode for street and travel photography. Imagine walking through a busy city district; you can lock in a wide aperture to blur out distracting backgrounds and focus purely on your subject. The camera ensures the exposure stays consistent as you move from bright sunlight to deeper shade. To make things even easier, you can set your ISO to “Auto,” letting the camera handle two-thirds of the work while you stay in control of the creative look.
Shutter Priority (S/Tv): Mastering Action
Shutter Priority (S or Tv) is the mode of choice when movement is the most important part of your story. You set the speed, and the camera handles the aperture. This is essential for capturing action, whether it’s a fast-paced sports match or a pet racing across a park. By choosing a fast shutter speed, you ensure the subject is sharp. Conversely, you can use a slower speed to intentionally blur motion, giving your photo a sense of energy and flow. It is a powerful way to control the “vibe” of your image without worrying about every single dial at once.
A simple way to see this in action is to find a moving fan or a pet at home. Switch your camera to Shutter Priority and take one photo at 1/1000 and another at 1/15. You will immediately see how your choice changes the story the photo tells. Practicing with these semi-auto modes builds the muscle memory and technical intuition you will eventually need for full Manual control. It is a pragmatic, stress-free way to transition away from Auto and toward professional-looking results.
Your First Shot in Full Manual Mode: A 4-Step Workflow
Moving the dial to the “M” position is the final, rewarding step in learning how to get out of auto mode camera habits. While it might feel like there are too many dials to manage, a simple, unhurried workflow makes the process manageable. Instead of letting the camera guess, you’ll use the internal light meter as your guide. This is the small scale you see at the bottom of your viewfinder or on your screen. It isn’t a judge of right or wrong; it’s just a tool that shows you how much light is hitting the sensor. Once you understand this scale, you can make intentional choices rather than accidental ones.
Step 1 & 2: Setting Your Creative Intent
Start by assessing your environment and deciding on the story you want to tell. First, set your ISO based on the available light. If you’re outdoors in the bright Singapore morning sun, keep it low at ISO 100 or 200. If you’ve moved into a shaded area or a building, start at 800 or 1600. Second, choose your aperture based on your desired look. Do you want a sharp subject with a soft, blurry background? Set a low f-number like f/2.8 or f/4. By making these two “style” choices first, you ensure the artistic soul of the photo is locked in before you worry about the technical balance.
Step 3 & 4: Balancing the Light
With your ISO and aperture set, your shutter speed becomes the final piece of the puzzle. Look through the viewfinder and adjust the shutter dial until the little marker on the light meter scale hits the center zero. Once it’s centered, take your shot. Don’t be afraid to immediately check your screen. While some traditionalists call this “chimping,” in 2026, using your digital display to verify brightness or check your histogram is a valid and smart way to learn. It provides the immediate feedback you need to grow.
If the resulting photo looks a bit too dark for your taste, simply slow down your shutter speed to let in more light. If it’s too bright, speed the shutter up. There is no “perfect” exposure, only the one that matches your vision. This trial-and-error process is exactly how you build intuition. To speed up this learning curve and see these principles in action, you can join a Photography Starter Session for hands-on, outdoor practice that turns these four steps into second nature.
Mastering Your Camera with Hands-On Field Practice
Reading about f-stops and shutter speeds is a necessary start, but it only accounts for about 10% of your progress. The other 90% of the journey involves standing in the field and actually pressing the shutter button. Theory is static, but light is dynamic. This is why outdoor field sessions are significantly more effective than classroom lectures for building lasting muscle memory. If you truly want to learn how to get out of auto mode camera settings, you have to practice where the light is constantly changing. Pictorial’s Photography Starter Session is the perfect first step toward that practical mastery.
Learning Without the Pressure
Having a seasoned mentor by your side changes everything. They can point to the exact dial on your specific camera model, whether it’s a new mirrorless or an older DSLR. This hands-on approach is the most reliable way to learn how to get out of auto mode camera menus and start using physical controls. Pictorial focuses on removing the barriers that stop most beginners:
- Zero Gear Stress: We provide complimentary loaner cameras so you can learn the craft before you buy expensive equipment.
- Tactile Learning: We identify the specific buttons on your unique device, avoiding the confusion of generic instructions.
- Direct Results: Our “no-Photoshop” goal ensures you capture professional images directly in-camera, saving you hours of editing later.
Join a Community of Fellow Learners
Photography shouldn’t be a solitary struggle. Our small-group workshops are limited to a maximum of three students, creating a relaxed, conversational space. You’ll join fellow learners in Singapore to explore the craft in a way that feels like a shared adventure rather than a rigid exam. It’s entirely possible to move from the limitations of “Auto” to the freedom of an “Artist” in a single afternoon. You will gain the independence to make your own creative choices with confidence and clarity. Ready to master your camera? Book your hands-on session here.
Take the Lead on Your Creative Vision
You now understand that aperture, shutter speed, and ISO aren’t just technical hurdles; they are the instruments of your creativity. By following a structured workflow and using the light meter as a guide, you’ve moved past the limitations of average software guesses. This shift allows you to capture the world exactly as you see it, rather than how a chip thinks it should look. It’s about moving from taking snapshots to creating intentional art.
Taking this knowledge into the field is where the real transformation happens. Learning how to get out of auto mode camera settings becomes intuitive when you’re practicing outdoors in the natural light of Singapore. Since Keith founded Pictorial in 2005, we’ve guided over 20,000 students through this transition. We intentionally keep our groups to a maximum of three participants, ensuring you receive the patient, personal mentorship you deserve to build your confidence.
Your camera is a tool meant to serve your vision, not dictate it. Start your photography journey with our Hands-On Starter Session and experience the quiet confidence of getting the shot right in-camera. It’s time to stop guessing and start creating. You have the vision; now you have the path to master it.
Common Questions About Manual Photography
Is it better to use Manual mode or Aperture Priority for beginners?
Aperture Priority is often the most pragmatic bridge for beginners because it allows you to control the creative look of your background while the camera handles the technical timing. It acts as a reliable safety net that builds your confidence. While full Manual mode is the ultimate goal for total control, starting with Aperture Priority helps you learn how to get out of auto mode camera settings without feeling overwhelmed by too many dials at once.
How do I get a blurry background with a basic kit lens?
You can achieve a soft background with a kit lens by using three simple techniques. First, set your aperture to the lowest f-number available, usually f/3.5 or f/5.6. Second, zoom your lens in as far as it goes to compress the scene. Finally, physically move closer to your subject while keeping the background distant. This combination forces the background out of focus, giving you that professional look without needing expensive gear.
Why are my photos still blurry even when I use Manual mode?
Blur in Manual mode is usually caused by a shutter speed that is too slow for the movement in the frame or your own natural hand tremors. If you are shooting handheld, try to keep your speed above 1/60 of a second. For moving subjects like children or pets, you might need 1/500 or faster. Checking your settings against the motion you see is the most grounded way to ensure every shot stays crisp and sharp.
Do I need to be good at math to understand the exposure triangle?
You don’t need to be a math genius to master your camera settings. Photography is a tactile craft based on observation rather than complex calculations. The relationship between aperture, shutter speed, and ISO is simply a balance of light. Once you see how turning one dial affects the others in a hands-on setting, the concept becomes intuitive. It is about developing a feel for the light in your environment rather than memorizing formulas.
Can I learn manual mode if I don’t own a professional camera yet?
You absolutely can start learning without owning any equipment. We believe that understanding the craft should come before spending money on gear. That is why Pictorial provides complimentary loaner cameras for our students during sessions. This allows you to practice on a capable device and learn which features you actually need before you make a purchase. It is a stress-free way to explore the craft without a large upfront investment.
What is the fastest way to learn camera settings in 2026?
The fastest way to learn is through immediate, hands-on practice in a real-world environment. Reading manuals only takes you so far; you need to see how settings react to actual sunlight and shadows. Joining a small-group workshop, like our Photography Starter Session, offers personalized guidance that targets your specific camera model. With a maximum of three students per group, you get the individual attention needed to turn technical theory into practical muscle memory quickly.
Should I use Auto ISO when I’m just starting with Manual mode?
Using Auto ISO is a pragmatic way to simplify the learning process while you focus on mastering aperture and shutter speed. It allows you to control the creative elements of depth and motion while the camera manages the sensor’s sensitivity. As you become more comfortable, you can eventually take over ISO control as well. It is a helpful tool that makes the transition to full manual feel less like a steep climb and more like a steady walk.
How long does it typically take to get comfortable out of Auto mode?
Most students find that a single, focused afternoon of outdoor practice is enough to understand the core principles. While true mastery takes time and repetition, you can gain the confidence to turn the dial away from Auto in just a few hours. By focusing on getting the shot right in-camera instead of relying on post-capture editing, you build a solid foundation that makes every future photo session more enjoyable and productive.