
How to Improve Photography Skills: A Practical Guide
More photos won’t necessarily make you a better photographer. If you keep taking familiar shots but can’t explain why one works better than another, it’s easy to wonder how to improve photography skills without buying new gear or memorising more rules. Camera settings and composition can feel disconnected until you practise using them together.
Make each photo a small experiment. Choose one thing to work on, such as the direction of light, your focus point, or how you frame a subject. Review the result and ask what changed and what you would try next time. This guide will help you build a repeatable practice habit, make deliberate choices, and learn from the photos you already take.
You’ll also find ways to identify what may be holding your images back and decide whether independent practice, tutorials, or hands-on instruction suits your goals. You don’t need to master everything at once. A clear next step can make your camera feel less like a set of rules and more like a tool you understand.
Key Takeaways
- Learn how to improve photography skills by identifying the choices that most often weaken your images.
- Use a simple practice loop to test one camera or composition decision at a time.
- Compare solo practice, online tutorials, and hands-on instruction to find the support that suits you.
- Choose a learning step that matches your current goal, whether you need a foundation or room to progress.
- Keep a brief record of what you intended to try and what you learned, so each shoot informs the next.
How to Improve Photography Skills by Identifying What Needs Work
Uneven results are a normal part of learning photography. A sharp, compelling frame might sit beside a photo that feels flat or cluttered, even when you used the same camera. To understand how to improve photography skills, look for patterns in what succeeds and what repeatedly disappoints rather than judging your ability by one image.
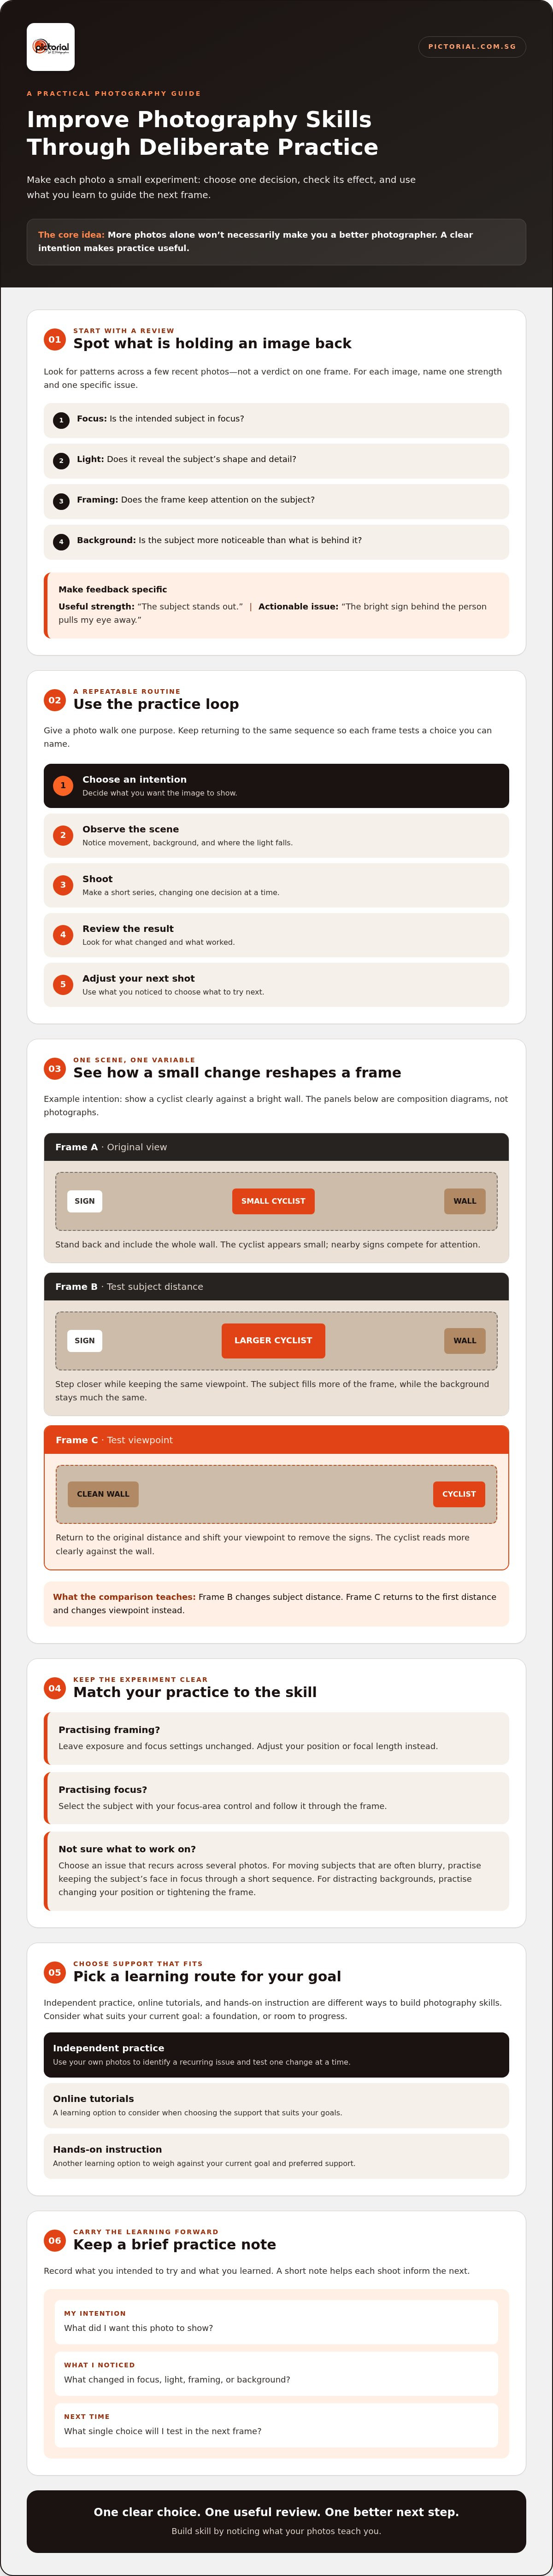
Choose a small set of recent photos and ask four questions: Is the intended subject in focus? Does the light reveal its shape and detail? Does the framing keep attention on it? Is the subject more noticeable than the background? These checks connect technical choices, such as focus, with visual ones, such as where you stand or what you include. For a broader grounding in how these elements come together, see this comprehensive overview of photography.
Deliberate photography practice means making one clear choice, checking its effect in the frame, and using what you learn to guide the next shot.
How can you tell what is holding your photos back?
Review a few images one at a time. For each, name one strength and one specific issue. “The subject stands out” is a useful strength; “the bright sign behind the person pulls my eye away” identifies something you can address. Be precise: a missed focus point is different from a deliberate choice to place the subject near the edge.
Try this annotated comparison with the same scene, a person beside a window:
Clear intention: “Show the person in soft window light.” Place the person near the window, focus on their eyes, and keep the bright window from dominating the frame. The light and framing both support the subject.
Distracting frame: “The person gets lost.” The eyes are soft, the window occupies much of the frame, and a bright object behind the person competes for attention. Labels on a side-by-side review could point to soft focus, bright distraction, and extra background space.
This comparison helps you name the cause instead of settling for “I don’t like it.”
Choose one photography skill to practise first
Look for an issue that appears across several photos. If moving subjects are often blurry, set a visible goal: keep the subject’s face in focus through a short sequence of shots. If backgrounds keep distracting, practise changing your position or tightening the frame. Work on one variable at a time so you can tell what made a difference.
If exposure controls are part of the problem, this guide to leaving Auto mode and gaining manual control can help you explore camera settings. For now, choose the issue that recurs most often and make it your next practice target.
Build Photography Skills with a Repeatable Practice Loop
A useful photo walk doesn’t need a long shot list. Give it one purpose, then follow the same sequence: choose an intention, observe the scene, shoot, review, and adjust. This turns “take more photos” into a practical answer to how to improve photography skills, because every frame tests a choice you can name.
Deliberate practice turns photo review into progress by using what you see in one frame to choose what to try in the next.
How do you turn a photo walk into a useful exercise?
Choose one subject, such as a cyclist passing a bright wall, and decide what you want the image to show: the person clearly against the colour. Before shooting, notice the direction of movement, the background, and where the light falls. Then make a short series, changing only one decision at a time.
- Frame A: Stand back and include the whole wall. The cyclist appears small, and nearby signs compete for attention.
- Frame B: Step closer while keeping the same viewpoint. The subject fills more of the frame, but the background stays much the same.
- Frame C: Return to the original distance and shift your viewpoint to remove the signs. Now the cyclist reads more clearly against the wall.
Composition diagram: Frame A: [sign] [small cyclist] [wall] → Frame B: [larger cyclist] [wall] → Frame C: [clean wall] [cyclist].
Caption: A shows the original distraction; B tests subject distance; C returns to the first framing distance and changes viewpoint instead.
Keep camera controls steady unless they’re the variable you’re practising. For a framing exercise, leave exposure and focus settings unchanged, then adjust your position or focal length. For a focus exercise, select the subject with your focus-area control and follow it through the frame. Looking at National Geographic photography can offer inspiration. Notice how photographers use viewpoint and timing to guide attention, then test one idea with a subject nearby.
How should you review photos after practising?
Compare each frame with your intention. Did the cyclist stand out? Which decision made the greatest difference: distance, viewpoint, timing, or focus? Review to understand your choices, not to depend on editing to rescue a frame that missed its purpose.
- Focus: Is the intended subject sharp?
- Exposure: Can you see useful detail in the subject and bright areas?
- Background: Does anything pull attention away?
- Subject clarity: Is it obvious what the viewer should notice first?
Write down one adjustment for your next practice session, such as “move left to clear the background.” If you’d benefit from applying camera concepts in the field, you can review Pictorial’s photography courses.
Compare Ways to Improve Photography Skills: Practice, Tutorials, or Feedback
There isn’t one right answer to how to improve photography skills. Independent practice, online tutorials, and hands-on instruction each help in different ways. The best fit depends on whether you need flexibility, help diagnosing a problem, or guidance applying a camera setting in a real scene.
Use this comparison to match the learning route to your current need:
| Learning route | Feedback access | Flexibility | Practical application | May suit you if… |
|---|---|---|---|---|
| Independent practice | Self-review or feedback you seek out | High | Direct, if you set a focused exercise | You like experimenting at your own pace |
| Online tutorials | Usually limited unless questions or critique are included | High; learn when it suits you | Depends on whether you practise alongside the lesson | You need an explanation of a specific technique |
| Hands-on instruction | Direct guidance may help clarify what to adjust | Follows the course structure | Can connect camera choices with results as you shoot | You want support applying concepts in the field |
Quick visual guide: Want freedom to experiment? Start with independent practice. Need to see a technique explained again? Try a tutorial, then test it yourself. Unsure why a setting produces a particular result? Consider hands-on guidance.
A new lens or camera may offer different capabilities, but it won’t decide where to stand, which part of the scene to emphasise, or how to use available light. Before upgrading, identify the specific limitation you’ve encountered and consider whether a change in technique could address it.
Can you improve photography skills by practising on your own?
Yes. Self-directed practice makes it easy to repeat an exercise, explore subjects that interest you, and work at a comfortable pace. The challenge is diagnosis: if a photo looks wrong, it may be difficult to tell whether focus, exposure, timing, or framing caused the problem. Avoid aimless repetition. Choose one goal, make a short set of images, compare them, and note one change to test next time.
When does instructor feedback make a difference?
Guidance can help connect a camera control with its visible effect. For example, an instructor might help you notice how changing a focus point affects a moving subject, then give you a chance to try again. Outdoor practice also lets you work with changing light and real backgrounds, rather than discussing settings only in theory.
Pictorial’s classes are small, with a maximum of three participants, and include practical outdoor guidance. Its Intermediate Photography Course runs for five two-hour sessions and includes Night Photography. This may suit learners seeking structured practice; independent practice or tutorials may fit better if you prefer learning alone or at your own pace. Compare the Intermediate Photography Course with your learning needs before choosing.
Choose the Right Next Step for Your Photography Goals
Once you know what you want to work on, choose a learning format that meets that need. If camera basics still feel uncertain, focus on building foundations. If you understand the controls but struggle to apply them, look for guided practice and feedback. If you’re ready to connect several skills and keep progressing, a broader structured course may be a better fit.
A short introductory format and a multi-session course serve different purposes. An introductory session can help you explore photography, while a course across multiple sessions gives you more time to work through a broader range of topics. Neither format is automatically better. Consider how much structure you want and what you hope to practise, then compare course descriptions for their intended learners and stated inclusions.
What should beginners look for in a photography course?
Look for clear explanations of camera controls, time to practise, and useful feedback on the photographs you take. A clear course description should say who the course is designed for and what it covers, so you can judge whether it matches your starting point. If you don’t own a camera, Pictorial includes a complimentary camera loan with every course if needed. Check the course details for its format and inclusions.
As you consider how to improve photography skills, prioritise a learning environment that helps you connect a choice, such as focus or exposure, with the result in your frame. That understanding gives you a practical foundation for making your own decisions.
What should developing photographers compare before choosing?
Compare the skills covered, the session structure, and whether practical shooting is included. For example, Pictorial’s Intermediate Photography CourseIntermediate Photography Course has five two-hour sessions and includes Night Photography. Check the course description to see whether its topics address the areas you want to develop, rather than choosing by level name alone.
If your goal is broader progression through a structured programme, review the Complete Photography Course and compare its stated scope with your needs. Read the course details, including the intended learner and confirmed inclusions, before deciding which format fits your pace and goals.
See Pictorial’s photography course options to compare the available learning formats.
Make Photography Practice a Habit and Keep Improving
Progress is easier to sustain when each shoot has a small purpose. Choose one decision to practise, review what happened, and use that observation to pick your next exercise. This is a practical way to keep learning how to improve photography skills without feeling you need to change everything at once.
How can you keep improving without feeling overwhelmed?
Stay with one skill until you can recognise its effect in your photographs. If you’re working on framing, compare a few images and notice how moving closer or changing your viewpoint affects the subject. Keep selected photographs that show what you tried and what you learned. There’s no required practice schedule, and an imperfect frame can still teach you something useful.
A brief note after a shoot is enough. Record your intention, what worked, and one adjustment to test next time. For example:
- Intention: Keep the subject clear against a busy background.
- What I noticed: Moving to the side removed a distracting sign.
- Next exercise: Try a different viewpoint and check whether the background stays simple.
Return to the images later and compare them with your notes. Look for decisions you can now make more confidently, not just technical perfection. Curiosity keeps practice useful: test a different position, wait for another moment, or try a new way of using the light.
How can a guided course support continued progress?
Self-directed practice is valuable, especially when you have a clear question to explore. Outside guidance may help if you keep encountering the same problem or find it hard to connect a camera setting with the result in your frame. Pictorial’s classes are small, with a maximum of three participants, and include practical outdoor guidance. Shooting outdoors gives you a chance to apply concepts while responding to real subjects, backgrounds, and light.
Choose guidance if you’d benefit from direct help as you practise, but don’t treat a course as the only route forward. A personal exercise and a few thoughtful notes can keep your learning moving between lessons or provide useful structure for practising on your own. Pick the approach that suits your current goal and preferred pace.
Keep Building Your Photography Skills, One Choice at a Time
Learning how to improve photography skills doesn’t mean changing every setting or buying more equipment. Start by noticing what works, choose one decision to practise, and review how it affects your photos. A short note about your intention and what you’d try next can turn each shoot into a useful step forward.
Keep returning to a skill until you can recognise its effect in your images. If you’d like guidance applying camera concepts as you shoot, Pictorial offers hands-on courses in small groups of up to three participants. A complimentary camera loan is included with every course if needed, so not owning a camera doesn’t have to stop you from exploring your options.
Whether you practise on your own or learn with guidance, stay curious and give yourself room to experiment. Each thoughtful frame helps you see the next one more clearly.
Frequently Asked Questions
How can I improve my photography skills as a beginner?
Start with one clear goal for each practice session, such as keeping a subject in focus or simplifying the background. Take a small set of photographs, compare them, and note what you’d change next time. This gives you a practical way to learn how to improve photography skills without trying to master every camera setting at once. Review both what worked and what you want to test again.
Can I improve my photography skills without buying a new camera?
Yes. Practise with the camera you already have, including a smartphone, and focus on decisions such as framing, viewpoint, timing, and where the light falls. A new camera won’t automatically solve a distracting background or unclear subject. If you’re unsure whether equipment is limiting a specific shot, first identify what you can’t achieve and whether changing your technique could help.
How often should I practise photography to get better?
There’s no single practice schedule that suits everyone. Choose a pace you can maintain and give each session a specific purpose, rather than taking photos without reviewing them. After practising, select a few images, note what you intended to do, and record one adjustment for next time. Regular, thoughtful practice can help you recognise how your choices affect the final frame.
Is taking a photography course better than learning on my own?
Neither approach is best for everyone. Learning on your own offers flexibility and room to experiment, while tutorials can help explain a particular technique. A course may suit you if you want structured practice and guidance applying camera concepts to real photographs. Consider what you need most: freedom to explore, clear explanations, or feedback as you shoot. You can also combine these approaches.
What should I practise first to take better photos?
Begin with the issue you notice most often in your own images. If the subject is hard to see, practise changing your position or framing to reduce background distractions. If moving subjects look soft, pay attention to focus and how you follow the subject. Work on one decision at a time, then compare your results so you can see whether the change helped.
Can I learn photography if I do not own a camera?
Yes. You can practise photographic choices with a smartphone, and you don’t need to own a camera to explore a course. Pictorial includes a complimentary camera loan with every course if needed. Check the course description for details about its intended learner and inclusions, then confirm current arrangements before enrolling. Learning to observe light, choose a viewpoint, and frame a subject can begin with the device you have.
How do I know when I am ready for an intermediate photography course?
You may be ready to explore an intermediate course intermediate course if you’re comfortable with basic camera use and want to build on it, even if your results are still inconsistent. Consider whether you want to deepen your control of exposure, focus, framing, or challenging conditions such as night photography. Pictorial’s Intermediate Photography Course has five two-hour sessions and includes Night Photography. Review its course description to see if the content fits your goals.

Article by
Keith Low
Photography Mentor & Founder