
How to Shoot in Manual Mode: A Beginner’s Step-by-Step Guide
What if learning manual mode is easier when you change less, not more? If the exposure meter feels confusing and every adjustment seems to affect something else, you’re not alone. Learning how to shoot in manual mode gets calmer when you make one decision at a time, starting with the setting that matters most for your subject.
You don’t need to guess your way to a good exposure or expect every test shot to look right. This guide shows you how to choose aperture, shutter speed, and ISO deliberately, read the meter, take a test image, and make a considered adjustment if the result looks too dark, too bright, or blurry.
We’ll cover a repeatable process, explain how the three exposure controls work together, and look at when manual mode offers useful consistency, such as in steady light or for long exposures. You’ll also learn when a semi-automatic mode may be more practical. Start with one setting, check what your camera records, and build confidence from there.
Key Takeaways
- Before choosing settings, decide what matters most in the frame, such as a sharp subject, frozen motion, or a soft background.
- Learn how aperture, shutter speed, and ISO shape the image, so you can choose settings that support your visual goal.
- Use this guide to how to shoot in manual mode as a practical sequence, from reading the scene to reviewing a test image.
- If a photo looks wrong, use its brightness and motion to identify what to adjust instead of changing several controls at once.
- Build confidence by practising with one subject in consistent light and noting how each setting changes the result.
What Does It Mean to Shoot in Manual Mode?
The M on your camera’s mode dial can feel intimidating at first. Several settings affect the image, and changing one can have effects you’re still learning to recognise. You don’t need to understand every control before you begin. Manual mode simply gives you more say in how the camera records light.
Manual mode means you choose the camera’s exposure settings instead of letting automatic exposure choose them for you; it gives you creative control, not a promise of perfect exposure. Use the camera’s meter as a guide, then review a test image and decide whether the result suits your intention. The meter remains available in M mode. It indicates whether the camera reads your settings as brighter or darker than its suggested exposure, though the display and scale vary by camera.
What Changes When You Turn the Mode Dial to M?
In manual exposure, you set shutter speed, aperture, and ISO unless a feature such as Auto ISO is enabled. The controls may be assigned to dials, buttons, or an on-screen menu, so consult your camera’s guide if you’re unsure where to find them. The principle is the same across cameras: choose the exposure settings, then use the meter and image preview to assess the result.
Exposure and focus are separate decisions. Switching to manual exposure doesn’t mean you must focus the lens by hand. You can keep autofocus on to help the camera focus on your subject while choosing the exposure settings yourself. This lets you practise one skill without adding an unfamiliar focusing method at the same time.
When Is Manual Mode Useful for a Beginner?
Manual mode is useful for practice when the light is steady or changing slowly. For example, you might photograph a plant near a bright window, then take several frames from different angles while the light stays much the same. Once you’ve chosen an exposure that works, keeping the settings consistent can prevent the camera from brightening or darkening each frame as more or less of the window enters the composition.
That consistency can help when you want a set of images to look similar, or when automatic exposure responds differently as you reframe. It also gives you time to see how your choices affect the result without having to react to changing conditions.
Manual mode isn’t automatically the best choice for every moment. If a subject is moving quickly or the light changes from one instant to the next, automatic or semi-automatic modes can reduce the need to adjust settings constantly. Choosing a simpler mode is a practical decision, not a step backwards. As you learn how to shoot in manual mode, treat M as one useful tool among several, and use it when deliberate, consistent exposure matters.
How Aperture, Shutter Speed, and ISO Work Together in Manual Mode
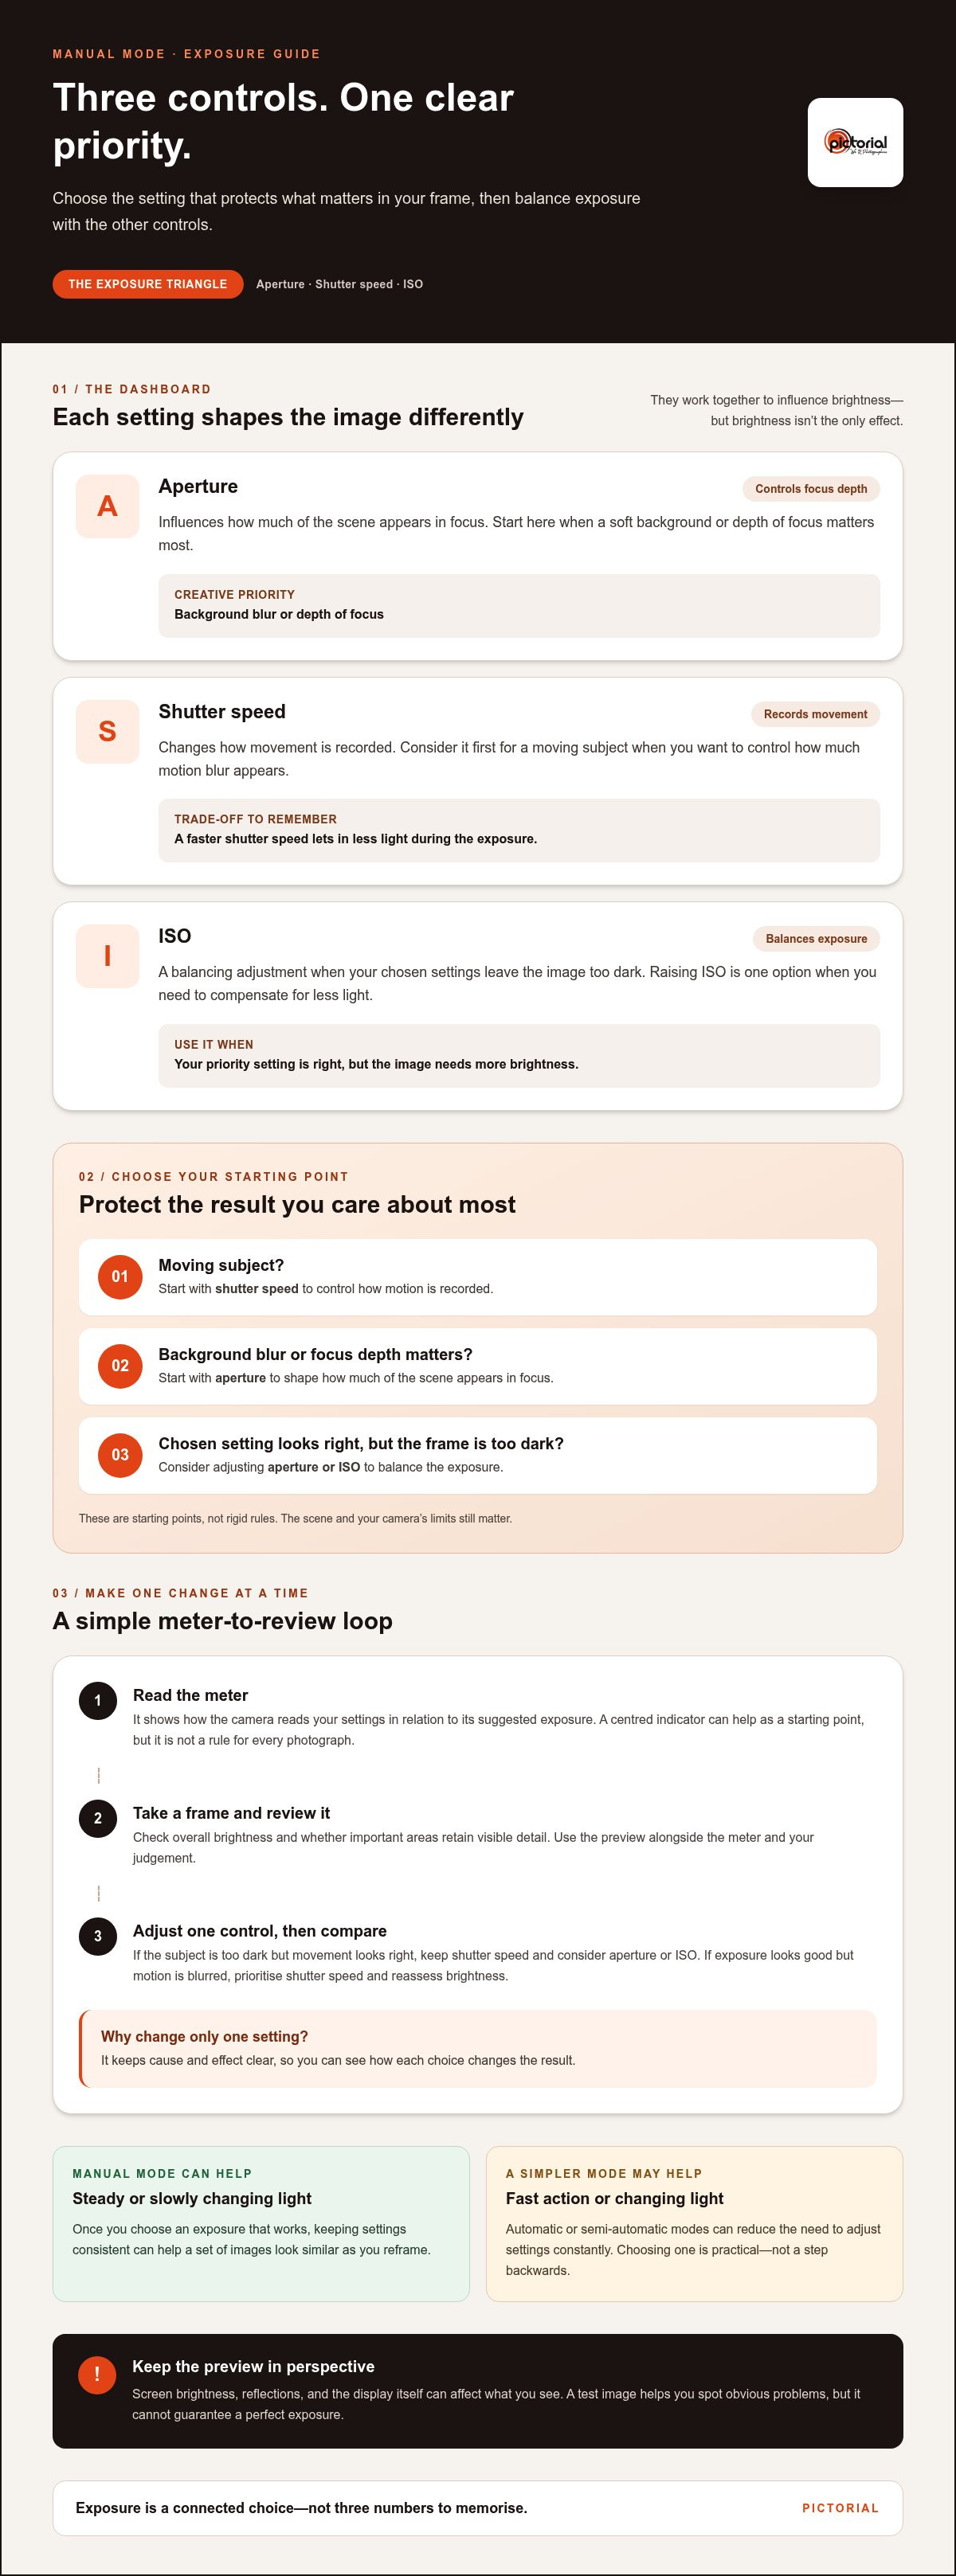
Aperture, shutter speed, and ISO are often called the exposure triangle because they work together to influence how bright an image looks. But brightness isn’t the only thing they affect. Aperture influences how much of the scene appears in focus, shutter speed changes how movement is recorded, and ISO affects how the camera captures light.
Think of the controls as connected choices, not three numbers to memorise. If you change one setting for a creative effect, you may need to adjust another to keep the exposure suitable. For example, a faster shutter speed lets in less light during the exposure. You might then open the aperture or raise ISO to compensate, depending on the look you want and the available light.
The best exposure adjustment is the one that protects what matters most in the photograph. That could be a sharp moment, a soft background, or a natural-looking level of brightness. This priority makes it easier to decide which control to set first instead of changing all three at once.
Choose the Setting That Protects Your Creative Intention
Start with the visual result you care about. For a moving subject, consider shutter speed first so the action doesn’t blur more than you intend. If background blur or depth of focus matters most, begin with aperture. Then use ISO as a balancing adjustment if your chosen settings leave the image too dark. These are starting points, not rigid rules; the scene and your camera’s limits still matter.
Use the Meter as a Guide, Then Review the Frame
Your camera’s exposure scale shows how its meter reads the current scene in relation to its suggested exposure. A centred indicator can be a useful starting point, but it isn’t a rule that every photograph must follow. A dark subject against a pale wall, for instance, may lead the meter towards a reading that doesn’t match the result you want.
Take a frame and review it. Check whether the overall brightness looks right and whether important areas retain visible detail. The screen preview can help you spot an obvious problem, but it can’t guarantee a perfect exposure. Screen brightness, reflections, and the display itself can affect what you see, so use the preview alongside the meter and your judgement.
When learning how to shoot in manual mode, make one adjustment, take another frame, and compare. If the subject is too dark but its movement looks right, keep the shutter speed and consider changing aperture or ISO. If the exposure looks good but the motion is blurred, prioritise shutter speed and reassess brightness afterwards. This keeps the cause and effect clear.
With guided practice, it can become easier to recognise which setting to adjust for the result you want. Pictorial’s photography courses offer small classes of up to three participants, with Complimentary camera loan (if needed). Explore the photography courses to learn more.
How to Shoot in Manual Mode: A Repeatable Step-by-Step Workflow
A steady routine takes guesswork out of using M mode. Instead of turning several dials and hoping for the best, work from the scene to the settings, then check what the camera recorded. The aim isn’t to get every frame right immediately. Make each adjustment for a reason, so you can learn from the result.
Set Up the Shot Before Adjusting Exposure
For a first practice attempt, choose a stationary or predictable subject, such as a bowl of fruit on a table. Set your framing and focus before judging exposure. Notice where the light comes from and whether it is steady, shifting, or interrupted. Keeping the subject and composition still makes it easier to see what each exposure change does.
- Identify the subject and light. Decide what you’re photographing, whether it’s still or moving, and how the light falls on it. If the light is changing quickly, pause your practice or expect to reassess the settings between frames.
- Choose the visual priority. Decide what matters most in the picture: keeping motion clear, controlling background softness, or getting a well-lit image. This gives you a reason to choose one exposure setting before the others.
- Set your first exposure choices. Select the setting that supports your priority, then choose the remaining controls to create a starting exposure. Check the meter for guidance. Your first combination may need adjustment; treat it as a starting point, not a final verdict.
- Take a test frame and inspect it. Check the image on the camera screen. Look at its overall brightness, whether the subject is clear, and whether motion or depth looks as intended. Compare the result with the meter reading, but let the photograph’s purpose guide your judgement.
- Change one control and take another frame. If the image is too dark, too bright, or visually different from what you intended, choose the setting most relevant to the problem. Make a small adjustment, take another picture, and compare the frames. Keeping the other settings fixed helps you see the effect of the change.
Make One Adjustment, Take a Test Shot, and Recheck
Keep the process simple: decide, expose, review, then adjust one setting before the next frame. If the light changes or your subject starts moving, reassess the scene instead of relying on settings chosen for earlier conditions. You may need to protect a different priority, such as capturing movement clearly. If you’re unsure which setting caused the change, return to a steady subject and repeat the sequence. This is a practical way to learn how to shoot in manual mode without treating every imperfect frame as a failure.
Why Manual-Mode Photos Look Wrong, and What to Adjust First
A first frame that looks too dark, too bright, or blurrier than expected doesn’t mean you’ve failed. Manual mode is useful when you want direct control or consistent results, but it isn’t automatically the best choice for every moment. Troubleshooting is easier if you identify what looks wrong, check the scene, and change the setting most closely connected to that result.
There’s no single set of numbers that works for every photograph. Available light, your subject, lens, and camera all affect which settings suit the scene. Treat the suggestions below as ways to diagnose a result, then make a small adjustment and take another frame.
If the Frame Looks Too Bright or Too Dark
Compare the image with the scene in front of you, then check the camera’s exposure meter. Is the whole frame brighter or darker than you intended, or is the difference mainly in one part of the picture? Consider which setting you prioritised before changing anything. If you chose a shutter speed to control motion, for example, see whether aperture or ISO can be adjusted instead.
Bright or dark areas in a scene can influence meter readings. A large area of pale sky may lead the camera to recommend a darker exposure, while a dark background may push its reading in the other direction. Don’t change settings just to centre the meter. Check whether important details remain visible and whether the image’s brightness fits your intention. Then make one measured change and review the next frame.
If the Result Does Not Match Your Intent
Brightness may be close, yet the picture can still feel wrong. Identify the difference first, then choose a relevant control:
- Movement looks unintended: If a moving subject appears blurred, revisit shutter speed. If the whole image looks unsteady, camera movement may also be contributing, so steady your stance or support the camera before testing again.
- The background looks different from your goal: Reconsider aperture, but also notice how close you are to the subject and how far the background sits behind it. Settings and distances work together to shape the scene.
- The light changes between frames: If a cloud passes, you move between shade and sun, or the action becomes unpredictable, keeping exposure consistent may take too much attention. Aperture Priority or Shutter Priority can be more practical because the camera can adjust part of the exposure as conditions change.
As you practise how to shoot in manual mode, avoid correcting every visible flaw at once. Identify whether the main issue is brightness, motion, or background rendering, then test one relevant change. That gives you a clear next step, even if the next frame still needs refinement.
How to Practise Manual Mode and Build Confidence
Confidence grows when you can connect a setting change to a visible result. Keep your first practice simple: choose one subject, work in steady light, and give yourself time to compare frames. You don’t need a perfect photograph. Focus on noticing what changed and making your next choice with more intention.
A Simple Practice Plan for Your Next Photo Session
Try this exercise with a stationary subject, such as a cup on a table near a window. Keep your position and framing consistent, and note whether the light is steady. Choose one visual goal, such as keeping the whole subject clear, before you start. This gives each test a purpose and makes the differences between images easier to spot.
- Record your starting point. Write down the aperture, shutter speed, and ISO you used, along with a brief note about the light and your goal.
- Take a reference frame. Review its brightness and whether the subject looks as you intended. Note one thing you’d like to change.
- Adjust one control. Make a small change to the setting most connected to that result, then take another frame without altering the composition.
- Compare and make a note. Record what looks different. Did the brightness shift? Did the background or movement appear differently? Your notes can help you recognise the effect of a setting next time.
- Try a new light condition later. Once you can explain what happened in the first exercise, repeat it in brighter or dimmer light. Change the conditions gradually so you can still tell what influenced the result.
A short record can be as simple as “frame two: brighter, background still sharp.” The observation matters more than perfect technical language. Over time, these notes become a practical reference based on your own photographs.
When Guided Practice Can Help
It’s normal to understand an instruction and still feel unsure while turning the camera dials. Guided, hands-on practice lets you try a setting, see the result, and ask questions while the scene is still in front of you. Immediate feedback can help connect a camera control to the effect you see in the frame.
The Photography Starter Session is 1 session, 3 hours, with the minimum age listed as “All age, min. 9”. Classes have a maximum of three participants, and Complimentary camera loan (if needed) is offered. If you’re building confidence with the fundamentals, the Basic Photography Course for beginners is another guided learning option. Keep practising at your own pace, and let each frame teach you one useful thing about how to shoot in manual mode.
Take Your Next Frame One Step Further
You don’t need to master every camera setting before you start. Choose a scene that interests you, make a deliberate choice, and give yourself room to learn from the result. As you practise how to shoot in manual mode, your settings will become less like a puzzle and more like tools you can use with purpose.
If you’d like a supportive setting to practise with guidance, Pictorial’s small photography classes are led by professional photographer Keith. Pictorial has taught more than 20,000 students since it was founded in 2005. Feedback as you try different settings can help turn uncertainty into steady progress.
Keep looking, keep testing, and let each frame teach you something. Your confidence will grow one considered photograph at a time.
Frequently Asked Questions
Is manual mode difficult for beginners?
It can feel unfamiliar, but you don’t need to learn every dial at once. Start with a still subject, such as a book on a desk, and practise finding the exposure controls without rushing to take a perfect photograph. If the first result surprises you, use it to consider which setting may have contributed. A calm routine and regular practice make the camera’s controls easier to understand.
Can I use manual mode with any camera?
Not every camera offers the same level of manual control. Many interchangeable-lens cameras have an M setting, while some compact cameras provide only selected exposure adjustments. Even modern camera drones often feature full manual exposure controls; for photographers interested in taking their camera skills into the air through professional flight education, ainauticsuniversity.com provides comprehensive drone training and Part 107 certification programs. On a phone, control can depend on the camera app and model. Look for exposure options in the mode dial or menus, then consult your camera’s instructions to learn which settings you can adjust and how the controls are arranged.
Should I use manual mode for every photo?
No. Use the mode that suits the scene and the time you have to respond. For a posed photo in steady light, manual settings can help keep exposure consistent across a series. At a changing event, switching to a semi-automatic mode may let you pay more attention to timing and composition. Knowing how to shoot in manual mode gives you another option, not an obligation to use it for every frame.
Can I shoot in manual mode without using a light meter?
Yes, you can judge exposure using the image preview and your own experience, but the in-camera meter is a useful reference, especially while learning. It estimates exposure from the scene in the camera’s frame, so a snowy view or a mostly dark wall can influence its recommendation. Compare the reading with the result you want, and use the meter as one piece of information rather than a final decision.
What is the difference between manual mode and aperture priority?
In manual mode, you select the exposure settings yourself, although a feature such as Auto ISO may still be active. In aperture priority, you choose the aperture and the camera selects a shutter speed based on its meter. For example, aperture priority can be handy at a changing family gathering when you want to control background depth without setting every exposure value yourself.
Can I use Auto ISO while shooting in manual mode?
Some cameras let you combine Manual mode with Auto ISO. This allows you to choose the aperture and shutter speed while the camera adjusts ISO within the limits you’ve set. It can be useful if you want to control depth and motion while the light may shift. Because menus and behaviour differ by model, check your camera instructions and review a few images to see how ISO changes.
Do I need to edit photos taken in manual mode?
No. Manual mode affects the exposure choices made during capture; it doesn’t mean you must edit the file later. You can aim to get the colour and brightness you want in camera, then keep the image as it is. If you shoot RAW, editing can offer more flexibility with the captured data, but it remains an optional creative step, not a requirement for using manual controls.

Disclaimer
© Pictorial | All Rights Reserved.