
Understanding Light in Photography for Better Portraits
Understanding light in photography means noticing its intensity, direction, colour and quality, then deciding how each affects a portrait. These qualities shape brightness, shadows and colour, so the way you use the light can matter as much as your camera settings.
Exposure and white balance can feel like a lot to manage at first. A portrait that looks too bright, too warm or flat can be frustrating, but you can learn to read the light and make practical adjustments instead of guessing.
This guide explains how exposure and white balance affect portraits, and how flash or reflected light can help shape them. You’ll also explore contour lighting and backlighting, along with ways to find colour contrast on cloudy days. With practice, light becomes something you can work with deliberately, rather than a mystery you have to solve by chance.
Key Takeaways
- Protect bright highlights when setting exposure, then adjust shadows to keep useful detail in the portrait.
- Use white balance to manage colour temperature; cloudy light may look more neutral with a setting around 7000K to 9000K.
- Shape facial shadows with flash or a reflector, and use a dark reflector to deepen shadow and contrast.
- Try contour lighting to define the face, or backlighting to separate your subject from the background.
- Clouds soften sunlight, so look for colour contrast between your subject and the surroundings to give a portrait definition.
Adjusting white balance, exposure, highlights and shadows
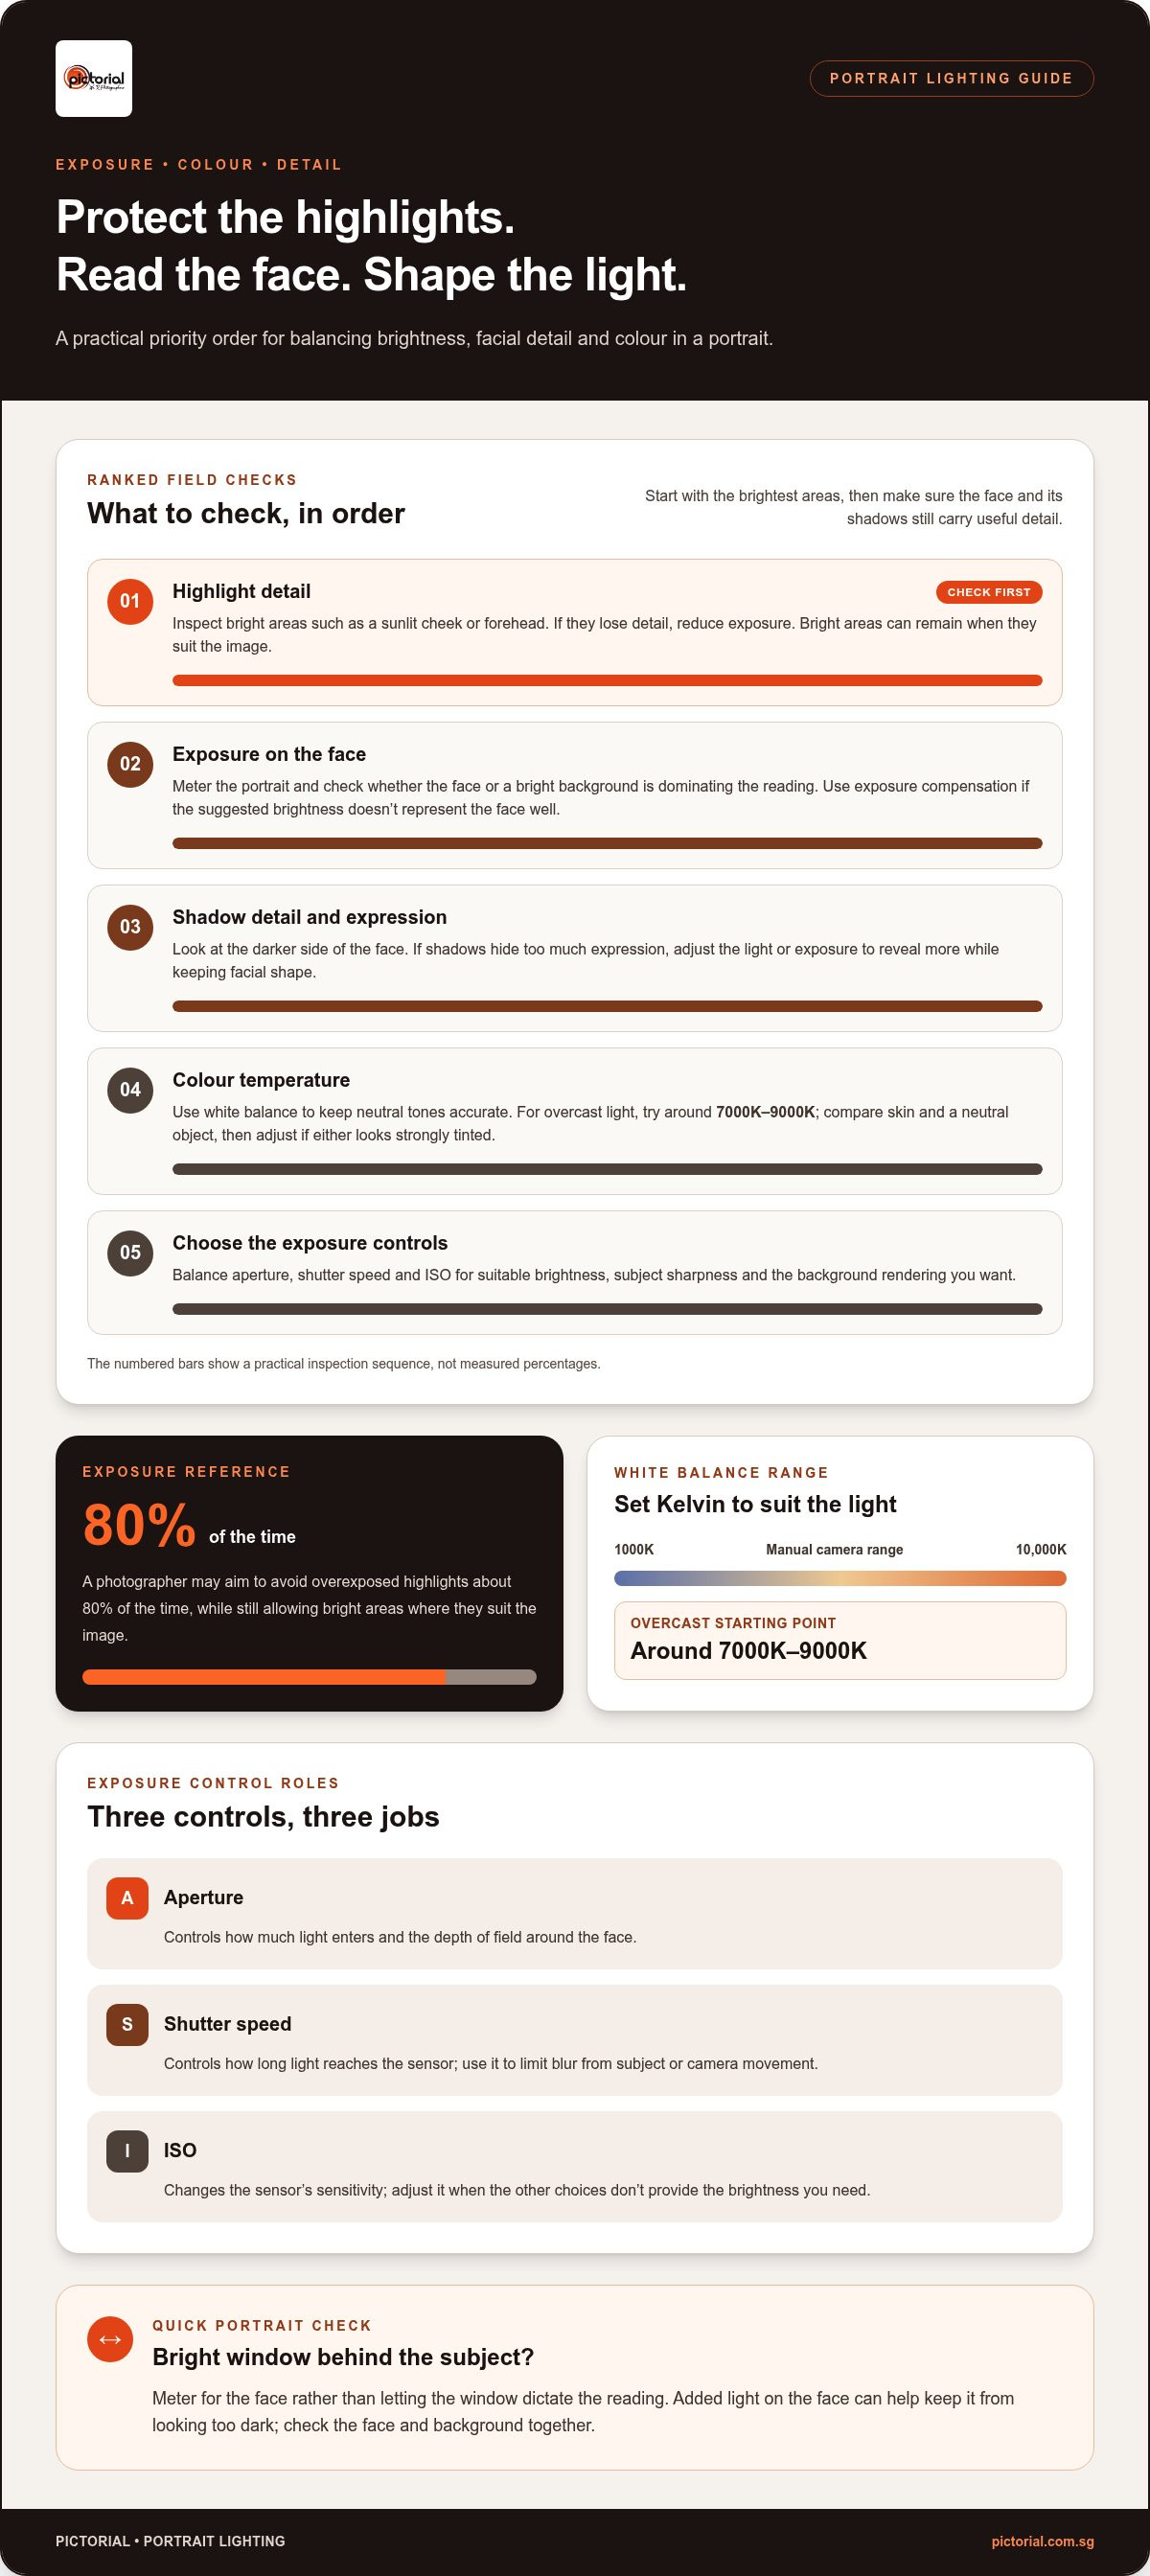
Portrait exposure depends on three camera controls, while white balance affects the colour of the light. Adjust each while paying attention to your subject’s face and the brightest areas in the frame.
White Balance and Colour Temperature
Colour temperature describes the warm or cool cast of a light source, and white balance helps render neutral tones accurately. Set manually with Kelvin values from 1000K to 10,000K, adjusting the camera to suit the light rather than changing the light itself. This matters in portraits because an incorrect setting can make skin look unusually orange or blue.
For an overcast scene, a Kelvin setting around 7000K to 9000K can make the image appear more neutral. Compare the preview with your subject’s skin and a neutral object, such as a grey shirt, then adjust the setting if either looks strongly tinted.
Exposure Controls and Scene Metering
Exposure is the brightness recorded by the camera, controlled by aperture, shutter speed and ISO. Aperture affects how much light enters and the depth of field; shutter speed controls how long light reaches the sensor; ISO changes the sensor’s sensitivity. Balance these settings to get suitable brightness while keeping the subject sharp and rendering the background as you intend.
Metering evaluates brightness in the scene and suggests an exposure. Point the camera at the portrait and check whether the face or a bright background is dominating the reading. Then use exposure compensation to make the result brighter or darker. In short, assess the subject in the frame and adjust compensation if the suggested exposure doesn’t represent the face well.
- Choose aperture for the depth of field you want around the face.
- Use shutter speed to limit blur from subject or camera movement.
- Adjust ISO when the other choices don’t provide the brightness you need.
Balancing Highlights and Shadows
Highlights are the brightest parts of a portrait; shadows are the darker areas that reveal shape and depth. Balance them by checking whether bright areas retain detail and whether important facial features remain visible. A photographer may aim to avoid overexposed highlights about 80% of the time, while still allowing bright areas where they suit the image.
Check the brightest areas first, especially a sunlit cheek or forehead, then look at the shadow on the other side of the face. If highlights lose detail, reduce exposure; if shadows hide too much expression, adjust the light or exposure to reveal more. For a portrait with a bright window behind the subject, meter for the face rather than letting the window dictate the reading.
Using flash or reflected light for portraits
Beginners can practise reading natural light by watching how a face changes as the subject turns toward a window, away from it, or into open shade. Compare the direction, softness and shadow pattern, then use flash or a reflector when the available light needs shaping.
Flash and Studio Lighting
Flash adds a controlled burst of light, while studio lighting gives you a deliberate source to position around a portrait. Both can help when natural light alone doesn’t reveal the expression or create the shape you want.
Direct flash can make a face look flat because the light comes from near the camera’s viewpoint. Change the flash’s direction to alter where shadows fall and add depth to the cheeks and facial features. In a studio, move the light source and watch how the shadows shift before choosing a setup.
Flash can also balance a bright background. If a subject stands near a sunlit window, for example, added light on the face can help keep it from looking too dark. Check the face and background together, because more flash can change the contrast between them.
Make a simple comparison: photograph the subject in the available light, then take another frame with flash. Look at the catchlights in the eyes, the shadow under the chin and the background brightness. These details reveal whether the added light supports the portrait or distracts from it.
Reflected Light for Portraits
Reflected light bounces off a surface onto the subject, and a reflector lets you direct it. This can brighten a shadowed side without adding another direct light source.
Place a reflector opposite a window or the sun, then angle it so light reaches the darker side of the face. A light-coloured reflector can fill shadows and reveal facial detail. A dark reflector can deepen shadows by absorbing light instead of bouncing more onto the subject.
Watch the eyes and cheeks as you shift the reflector. If the fill makes the face look too evenly lit, move the reflector farther away or change its angle to restore some shadow shape. If reflected light creates a bright patch, redirect it before moving the subject.
Practise with a white wall, pale pavement or plain sheet as a reflective surface. Ask the subject to hold a steady pose, then compare frames as you change the reflector’s position. Notice which surface lifts the face helpfully and which creates distracting or uneven light. This builds a practical understanding of how direction and reflection affect a portrait.
Contour lighting and backlighting
Contour lighting uses light along the edge of a subject to define its shape. Backlighting places the main light behind the subject, creating a bright outline or a stronger silhouette. In portraits, these approaches can separate a person from the background and draw attention to their profile, hair or shoulders.
Using contour light to define a portrait
For contour lighting, position the light behind and to one side of the subject. Let it catch an edge, such as a curl of hair or a shoulder, without overpowering the face. Watch the outline through your camera as the subject turns: a small change in angle can shift the highlight from the hair to the cheek.
A dark background makes a narrow rim of light easier to see. Against a pale wall, the edge may blend in, so try a darker background or reposition the subject. For example, a light behind one shoulder can clarify the outline of someone wearing a dark jacket.
Keep the face in view as you shape the edge. If the contour becomes the brightest feature, move the light farther behind the subject or adjust its angle. The goal isn’t simply a glowing border; use it to separate the person from nearby shapes while keeping attention on their expression.
Working with backlighting
Backlighting comes from behind the subject, often toward the camera. A window, bright sky or lamp can provide it. For a portrait beside a window, place the subject between the window and camera, then observe how the light outlines the head and shoulders. The background may be bright while the face receives less direct light.
Choose the effect according to what the portrait needs. To keep the face recognisable, move the subject slightly toward the window or use front light to reveal facial features. For a silhouette, turn the face away from the brighter background and let its outline carry the image. Each position changes how much detail remains visible.
Watch for flare, which can appear when a bright source shines toward the lens. Shift your camera position or block the source with the subject’s head, while making sure the outline remains visible. If the face looks too dark, adjust your framing and exposure for the portrait, not the bright background. Review the image before changing position again.
Try a simple comparison: photograph the same pose with the light behind the subject, then move the subject until the light falls to one side. Notice how the outline, facial detail and background change. The side-lit frame may retain more detail, while the backlit frame can feel more graphic. This helps you choose contour light deliberately.
Finding colour contrast on cloudy days
Cloudy light can make a portrait feel soft and even, but colours may seem muted. Clouds diffuse sunlight across a larger area, softening shadows. To find colour contrast, look for clothing or surroundings that differ clearly in colour, then frame the subject against that background.
Daylight changes through the day, so the same portrait location can produce different colours and shadows. Golden-hour light can give scenes a warmer appearance. Blue hour brings cooler-looking light around twilight, while overcast conditions soften direct sunlight and reduce strong shadows.
Scan the background before posing your subject. A person in a red jacket may stand out against green foliage, while a pale shirt can separate from a darker wall. In Singapore, try a sheltered walkway or open space after clouds have softened the sun. Keep the background simple enough that its colour supports rather than competes with the face.
Cloud cover can help with skin tones because softened light reduces sharp transitions between bright areas and shadow. But a grey sky and grey surroundings may leave a portrait without separation. Use a coloured object, clothing or background to create contrast. For example, position a subject in a warm-coloured top near cool green plants, then check the camera preview to make sure the colours are distinct.
Adjust your viewpoint before changing camera settings. A small move left or right can place a darker tree behind the subject instead of a pale sky. You can also ask the subject to turn slightly so the open sky lights their face while the background retains a distinct colour. Compare the face, clothing and backdrop together.
- Look for contrasting colours in clothing, plants, walls or nearby objects.
- Move your position to simplify the background and separate the subject.
- Use the camera preview to judge whether the face remains the focal point.
On a cloudy day, colour contrast can give a portrait more visual structure when hard shadows are absent. For instance, a subject in a bright shirt against deep foliage creates separation without direct sun. Notice how the colours work together, then refine your framing until the face is easy to find.
What are the basic properties of light in photography: intensity, direction, colour and quality?
Four properties help explain why a portrait changes between a window, a shaded walkway and an open field: intensity, direction, colour and quality. Understanding light in photography starts with noticing these features before adjusting your camera, so you can anticipate their effect on the subject.
Intensity: how much light reaches the subject
Intensity is the amount of light falling on a subject, affecting how bright or dark the photograph appears. Someone beside a bright window receives more light on the window-facing side than someone farther inside the room. Move the subject closer to the window, or choose a brighter position, to change the light reaching their face.
Distance and obstructions affect intensity. A nearby wall can block window light, while moving into an open area removes that obstacle. Compare the subject’s face with the background through the camera. If one is much brighter, adjust the subject’s position or exposure to suit the portrait.
Direction: where the light comes from
Direction describes the path light takes toward the subject. Front light reaches the face from near the camera and can reduce visible facial shadows. Side light creates more distinction between the lit and shaded sides, while light from behind can outline hair and shoulders. Move around a window to see how these patterns shift.
Ask the subject to turn toward the window, then sideways. In the first pose, more light falls across the face; in the second, the shadow pattern becomes easier to see. Watch how the shadows from the nose and cheek move before choosing an angle for the portrait.
Colour: the tint carried by light
Light can look warm, cool or close to neutral, affecting the colours recorded in a photograph. Human vision detects three colours, and other colours form from mixtures of them. This helps explain why a coloured light source can change how skin, clothing and backgrounds appear together.
A portrait near a warm indoor lamp may show a different colour cast from one beside daylight. Look at a neutral surface, such as a white shirt, to notice the tint. Then consider whether the colour suits the scene or distracts from the subject’s natural appearance. This observation is an important part of understanding light in photography.
Quality: how hard or soft the light appears
Light quality describes the character of the shadows it produces. Hard light comes from a source that is small compared with the subject, creating dark, sharp shadows. Diffusion spreads the light and softens shadows, making transitions across the face less abrupt.
Compare direct sunlight with light passing through a diffuser. In the first portrait, the shadow beneath the nose may have a clear edge; in the second, it appears softer. This difference helps you choose light that suits the expression and shape you want to show.
Pictorial: Photography Starter Session
Pictorial’s Photography Starter Session gives beginners hands-on guidance in reading light. If exposure, colour and direction are difficult to judge in real scenes, outdoor shooting can connect these ideas to what you see through the camera. Groups are limited to three participants, with personalised guidance. You can use your own camera or a complimentary camera loan if needed.
As you practise, observe how moving the subject or changing your viewpoint shifts the light in a portrait. It’s a useful next step when you’re ready to apply these ideas with guidance as you shoot.
Contact Pictorial or visit pictorial.com.sg to learn more.
Keep building your eye for light
Treat your next portrait as a small experiment, not a test to pass. Choose one location and make a few frames as the subject turns or moves. Then notice which lighting choice best supports their expression. This habit turns understanding light in photography into practical judgement you can use with different subjects and settings.
For guided practice, Pictorial’s Intermediate Photography Course can support your next steps, while Mobile Photography Essentials focuses on taking photographs with a mobile device. Choose the course that matches what you want to practise, and keep observing how your choices change the portrait.
Keep experimenting at your own pace. Each thoughtful frame is another chance to see light more clearly.
Frequently Asked Questions
What is the difference between hard light and soft light in photography?
Hard light creates clearly edged shadows, while soft light produces gentler transitions between light and shade. Direct sunlight on a face may create a distinct shadow beneath the nose, while light from a large window can soften that edge. The source’s size relative to the subject matters: a larger apparent source spreads light more broadly. Choose according to whether you want crisp definition or softer facial detail.
How does light direction affect shadows, depth and mood in a photograph?
Light direction determines where shadows fall and changes how three-dimensional a subject appears. Side light can reveal the texture of a knitted jumper or the curve of a cheek, while front lighting can reduce those shadows. For a more dramatic portrait, position the subject so light reaches one side of the face. For a calmer, more even look, bring the light closer to the camera’s direction.
How do photographers use white balance and colour temperature in Kelvin?
Photographers use white balance to manage the colour cast recorded under different light sources. Manual Kelvin control lets photographers adjust the image’s colour balance to suit the light or intended look. If warm lamps make a white object look orange, adjust the setting and review the camera preview. Compare the result with your intended mood, as a warm cast can also be a deliberate creative choice.
How do reflectors, diffusers and flash change light in photography?
A reflector redirects existing light, a diffuser spreads light to soften its effect, and flash adds a burst of light. Outdoors, a reflector can lift shadows beneath a hat brim without changing the sun’s direction. Place diffusion between a bright source and the subject to soften the light. Use flash when the subject needs added light, such as when they are standing in shade against a brighter background, then compare the face with the surroundings.

Disclaimer
© Pictorial | All Rights Reserved.