

Photography Composition Rules for Beginners: Build Stronger Photos
What if the best way to improve a photo isn’t to follow every composition rule, but to decide what deserves the viewer’s attention? If your pictures feel cluttered or the main subject gets lost, you’re not alone. Photography composition rules for beginners can sound like a checklist, especially when it’s not clear how to use them in a real scene.
These guidelines are useful starting points, not laws. Small choices, such as moving your subject off-centre, following a line through the frame, or leaving more space around a subject, can make a photo easier to read. Start by noticing what competes for attention, then decide where you want the viewer to look.
In this guide, you’ll learn practical ways to arrange subjects, lines, space, and balance while framing a shot. You’ll also see when a familiar technique helps and when breaking it can make an image stronger. Try one deliberate change at a time. With practice, composition becomes a skill you can use to make clearer, more intentional photographs.
Key Takeaways
- Composition means choosing what enters the frame and arranging it to guide the viewer’s attention.
- Use photography composition rules for beginners as flexible starting points, then notice how each choice changes what stands out.
- Match a technique to the scene rather than relying on the rule of thirds for every photo.
- Use a simple frame check: identify your subject, simplify distractions, arrange the elements, then review the edges.
- Move slightly and compare two possible frames to practise making deliberate composition choices.
What photography composition means, and why a clear frame matters
Composition is the set of choices you make about what appears in a photograph and where each element sits. You’re not just pointing the camera at a subject. You’re deciding what to include, what to leave out, and how the parts of the scene relate to one another.
Composition is choosing what fits inside the frame and arranging it to guide the viewer’s attention. When the arrangement is clear, the viewer can find the main subject and understand its place in the scene. A person photographed against a plain wall, for example, may stand out more clearly than the same person surrounded by bright signs, busy patterns, and overlapping objects.
That doesn’t mean every strong photograph must look tidy or follow a formula. A busy frame can suit a lively street scene, while empty space can make a small subject feel isolated. Think of photography composition rules for beginners as practical prompts: each helps you make a choice, but none guarantees an engaging photo. The familiar Rule of Thirds in Photography, for instance, offers one way to place a subject, not a position you must use every time.
Start by identifying the photograph’s main subject
Before changing your framing, ask yourself: What should the viewer notice first? It might be a friend’s expression, a flower in a garden, or a stallholder arranging produce. Then decide which details support that subject and which ones compete with it.
Look for distractions that attract the eye through brightness, colour, size, or contrast. A bright sign behind a person may draw attention before their face does. Try shifting your position so the sign sits outside the frame or no longer lines up behind the subject.
Look at the whole frame, not just the subject
It’s easy to focus on your subject and miss what’s happening around it. Scan all four edges for cut-off objects, stray branches, bright patches, or empty areas that don’t help the picture. Check the background too. It can provide useful context, such as showing where someone is, or make the frame feel cluttered.
Foreground details matter as well. A nearby railing might lead the eye into the scene or block part of the subject. Before deciding the frame is finished, move a little to the left or right, or take a small step forward. Compare what changes. In a basic photography course for beginners, you can practise these small framing decisions in real scenes.
Five beginner photography composition rules to try in the frame
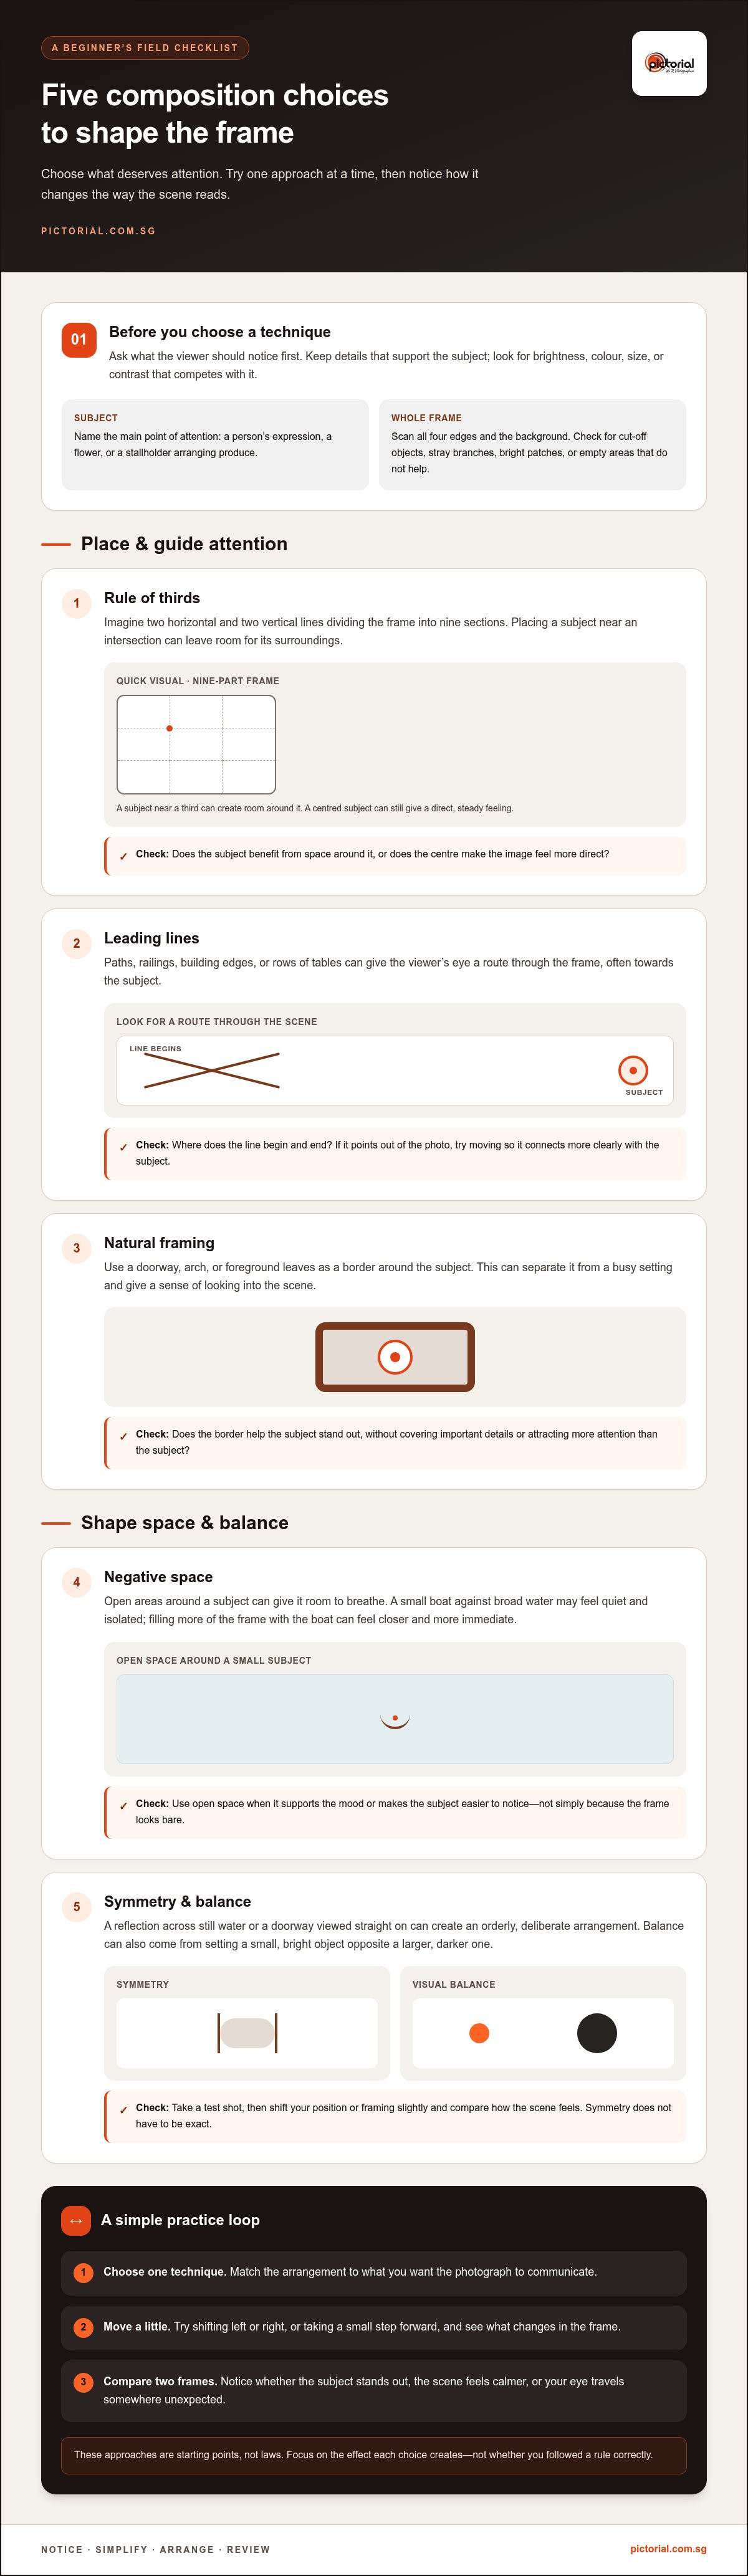
These five approaches offer practical ways to arrange a scene, but they aren’t a formula for every photograph. Try one at a time and notice what changes. Does the subject stand out? Does the scene feel calmer, or does your eye travel somewhere unexpected? Adobe’s guide to Understanding Photo Composition also explores how framing choices shape an image.
Use thirds, leading lines, and framing to guide attention
Rule of thirds: Imagine two horizontal and two vertical lines dividing the frame into nine sections. Placing a subject near one of the intersections rather than in the centre can create room for its surroundings. A cyclist near the left third, for example, may have space ahead to move into. A centred subject can still work when you want a direct, steady feeling.
Leading lines: Paths, railings, building edges, or rows of tables can draw the eye towards a subject. A leading line gives the viewer’s eye a route through the frame, often towards the subject. Check where the line begins and ends. If it points out of the photo instead, it may lead attention away. Change your position to see whether the line connects more clearly with the subject.
Framing: Place a subject within a natural border, such as a doorway, an arch, or leaves in the foreground. This can separate the subject from a busy setting and give the viewer a sense of looking into the scene. Make sure the framing element doesn’t cover important details or draw more attention than the subject.
Use negative space, symmetry, and balance with intention
Negative space: Open areas around a subject can give it room to breathe. A small boat against a broad stretch of water may feel quiet and isolated; filling more of the frame with the boat could make the image feel closer and more immediate. Use open space when it supports the mood or makes the subject easier to notice, not simply because the frame looks bare.
Symmetry and balance: A reflection across still water or a doorway viewed straight on can create an orderly, deliberate arrangement. Symmetry doesn’t have to be exact. Balance can also come from placing a small, bright object opposite a larger, darker one, so neither side of the frame feels too heavy. Take a test shot, then shift your position or framing slightly and compare how the scene feels.
As you practise photography composition rules for beginners, focus on the effect each choice creates rather than whether you followed a rule correctly. For guided practice, explore the basic photography course for beginners.
Which composition rule should you use, and when can you break it?
A scene rarely announces which composition technique it needs. Start with what you want the photograph to communicate, then choose an arrangement that helps the viewer notice it. Use the table as a quick guide while framing your shot.
| What you see in the scene | Technique to try | What it can do |
|---|---|---|
| A path, railing, or row of objects points towards your subject | Leading lines | Creates a visual route towards the subject |
| Your subject blends into a busy background | Negative space or natural framing | Separates the subject from competing details |
| A reflection or building has a clear, balanced structure | Symmetry or centring | Creates an orderly, deliberate feeling |
| The subject seems static or too close to the edge | Rule of thirds | Adds space around the subject or suggests direction |
| The scene feels visually heavy on one side | Balance | Uses another element to steady the frame |
Match the technique to the scene you are photographing
Use leading lines when they naturally direct the viewer’s gaze towards your subject. For example, a footpath that bends towards a person can add depth and guide attention. If the path runs out of the frame, try a different position or choose another approach.
Negative space can help when a subject needs room to stand apart. A person against an uncluttered wall may become easier to notice, while a wide area around a lone object can suggest stillness. Choose symmetry when the scene already offers a strong structure, such as a reflection or a centred doorway. Forcing symmetry when the elements don’t align may make the frame feel strained.
Know when to adapt or ignore a familiar rule
The rule of thirds is a starting point, not a requirement. Placing every subject off-centre can make your photographs feel repetitive, and some subjects look stronger in the middle. A centred portrait can seem calm and direct; a symmetrical building may look more settled when its main line runs through the centre.
You can also use deliberate imbalance or a tight crop to support an idea. Leaving a large area of empty space beside a subject might suggest distance, while placing a small object near the edge can make the frame feel unsettled. These choices work best when they look intentional, rather than as if something was accidentally left out.
A composition rule is useful when it supports the image’s intent. After trying a technique, check the result: is the subject easier to understand, and does the arrangement create the feeling you wanted? If not, shift your position, change the amount of space around the subject, or try a different framing choice. Photography composition rules for beginners are most useful when they help you make that decision, not when they make it for you.
A simple frame-check routine to practise composition as a beginner
A repeatable check can help you move from knowing composition ideas to using them while you shoot. Before pressing the shutter, pause and work through four steps: identify, simplify, arrange, then review. You don’t need new equipment to practise. One subject and a few small changes in position are enough to show how framing affects the picture.
Use four questions before pressing the shutter
- Identify: What should the viewer notice first? Name the subject in a few words, such as “the red flower” or “the person waiting by the window.” If your eye keeps jumping to something else, decide whether that detail belongs in the frame.
- Simplify: What can you leave out? Look for bright spots, overlapping objects, or background details that compete with your subject. Step to one side or adjust your framing to reduce distractions before taking the picture.
- Arrange: Which visual choice supports the subject? Check whether a line points towards it, open space gives it room, or the arrangement feels balanced. Choose the technique that fits the scene rather than trying to use several at once.
- Review: What’s happening at the edges? Look for objects cut off in a way that feels accidental, or details entering the frame and pulling attention away. If something feels awkward, move slightly and check again.
This routine gives you a clear reason for each adjustment. It also makes photography composition rules for beginners easier to apply because you’re responding to the scene rather than trying to remember a list of terms.
Practise one scene with more than one composition
Choose a simple subject, such as a cup on a table or a plant beside a window. Take one photograph with the subject centred, then make another with it off-centre. Next, move a little and see how the foreground and background shift around it. A small change may bring a distracting object into view or place a clean area behind the subject.
Compare the versions side by side. Which makes the subject easier to recognise? Which better suits the feeling you want? You might prefer the centred frame for a direct, settled look, while the off-centre version gives the scene more space or direction. There isn’t always one correct answer. Comparing the images helps you notice what your choices do.
Repeat the exercise with familiar scenes instead of chasing new gear. For a broader routine that builds on these small exercises, explore practical ways to improve photography skills. Regular, deliberate framing gives you more chances to notice, test, and refine your choices.
Explore the basic photography course for beginners
Keep learning composition through hands-on photography practice
Composition gets easier to understand when you practise it in real scenes. Each time you pause to check the subject, background, lines, and open space, you make a choice you can learn from. The aim isn’t to produce a perfect photo every time. It’s to notice what your framing does, then try another arrangement when the picture doesn’t communicate what you intended.
What guided composition practice can help you work on
It can be hard to spot every distraction while you’re concentrating on taking a photograph. An instructor’s feedback can help you notice how a bright background detail competes with your subject, or how moving a step changes the way foreground and background elements line up. You can then adjust the frame and see the effect for yourself.
Practise with familiar subjects. Photograph a plant from different angles and observe how the background changes. Frame a person with more space on one side, then compare the result with a tighter arrangement. Ask what feels clear and what draws your eye away. These small comparisons help turn photography composition rules for beginners into deliberate choices you can repeat, adapt, or set aside.
Choose a beginner-friendly next step
If you’d like support as you practise photography fundamentals, the Photography Starter Session is one session of 3 hours. All age, min. 9. Classes have a maximum of three participants, and Complimentary camera loan (if needed) is available. The session offers hands-on practice with framing choices and photography fundamentals.
The Basic Photography Course is another option for building your foundations. Whichever next step you choose, keep returning to the same simple habit: look carefully, frame with purpose, and learn from the versions you make.
Explore photography learning options
Make your next frame a deliberate one
The next time you pick up your camera, choose one subject and give yourself a moment to decide what you want the photograph to say. Use photography composition rules for beginners as prompts, not a checklist. Try a framing choice, look at the result, and adjust. Each small decision helps you build your own way of seeing.
If you’d like guidance as you practise, Pictorial’s Photography Starter Session offers hands-on learning in a small class. Founded in 2005 and led by professional photographer Keith, Pictorial has taught more than 20,000 students. Classes have a maximum of three participants, creating room for personalised guidance and practical outdoor shooting.
You don’t need to get every frame right. Keep noticing, keep trying, and let each photograph teach you what to look for next.
Frequently Asked Questions
Is the rule of thirds necessary for every photograph?
No, the rule of thirds is optional. It can help when placing a subject off-centre gives the scene more room or direction, but a centred arrangement may suit a face, a doorway, or a subject looking straight at the camera. Take two frames with different placements and compare them. Choose the one that best suits your subject and the feeling you want, rather than applying the grid automatically.
Can beginners take well-composed photos with a smartphone?
Yes. A smartphone is enough to practise photography composition rules for beginners because composition depends on what you include and how you arrange it, not just on the camera. Try changing your viewpoint before taking the photo, and tap the screen to make sure the intended subject is clear. You can also use the phone’s grid display as a framing aid, then turn it off once you’re comfortable judging the layout yourself.
How do I choose a focal point in a photograph?
Choose the detail that carries the main idea of the photograph. In a picture of a meal, that might be one dish rather than every item on the table; in a family scene, it could be the person reacting rather than the whole group. Ask what you want someone to notice first. Then use focus, position, or a cleaner background to make that detail stand out from nearby elements.
What is the difference between negative space and empty space?
Negative space is the area around or beside a subject that helps the composition feel clear or expressive. Empty space is simply an area with little detail, and it may or may not help the photo. For example, a plain wall beside a person can leave room for their gaze and keep attention on their expression. If the blank area adds no meaning and makes the subject feel lost, reframe the shot.
Should I move closer to my subject when composing a photo?
Move closer if the subject feels too small or surrounding details distract from it, but check what the tighter view leaves out. A close view of a flower may reveal its shape and texture, while a wider frame can show its relationship to the garden. You can also try stepping sideways instead of forward. That changes how objects overlap and may separate the subject from its background without losing useful context.
How can I make a photograph feel less cluttered?
Start by removing one distraction at a time. Reposition yourself so a bright object no longer sits behind the subject, wait for people to move out of the background, or adjust the frame to exclude unrelated details. If the scene still feels busy, decide which element matters most and let the others play a smaller role. A photograph can include plenty of detail and still feel clear if the main point is easy to find.
Does the shape of the frame affect photography composition?
Yes. A horizontal frame often suits a wide view or a group, while a vertical frame can give a person, tree, or tall building more room. The shape also affects what gets cropped out, so check the edges after changing orientation. Before shooting, consider where the photo will be viewed or shared, then compose within that shape instead of relying on a later crop to fix important framing choices.

Disclaimer
© Pictorial | All Rights Reserved.